08 December 2006

Effective Writing

Found Jeremy Stell-Smith's Effective Writing a very useful guide from a TDD developer’s point of view on getting things done – without being distracted or going deviation in the writing.

I still got a few travel essays pending – ‘todo’ since July - seem very daunting task, considering it is a part-time hobbits thing. In the running up to the New Year, I am going to try to apply these principles.

  • Work top down – do outline first
  • Question Driven Writing – compare that to test driven development to stay on topic.
  • Work in Sprints - cutting off the distraction and shut yourself down to external.

  • 11 November 2006

    AppDomain, process and components...

    This is a fundamental concept in .Net. In this short retrospective I try to offload following points:
    1. What is AppDomain? Aslo a derived question: what is the difference between Appdomain and process?
    2. Why we need AppDomain?
    3. What is the design implication of Appdomain has on software?

    So what is AppDomain? What is the difference between Appdomain and process?
    From gotnotnet
    “Application Domain is a construct in the CLR that is the unit of isolation for an application.” In non-.NET CLR environment, each running application is hosted by a process. There can be numerous processes launched of the same application and each process can only host ONE application. In contrast, .NET CLR introduces a light-way unit to load an application – AppDomain. Each AppDomain hosts one application, (or indeed assembly, component). Each process can have multiple AppDomains.

    Why we need AppDomain?
    AppDomain provides isolation around applications without the heavy cost associated with running an application within a process (address space, context, security...). In another word when addressing security context for example, it is wrapped around process unit. It relives each resident in an AppDomain from handling it themselves.

    The isolation means:
    • An application can be independently stopped.
    • An application cannot directly access code or resources in another application.
    • A fault in an application cannot affect other applications.
    • Configuration information is scoped by application. This means that an application controls the location from which code is loaded and the version of the code that is loaded.

    What is the design implication of AppDomain has on software?
    AppDomain promotes a loose-coupled component-oriented programming mode.

    The term component is probably one of the most overloaded terms in morden software engineering. From Wikipedia I found quite a few entries, which defines ‘component’ in different domain. Where it is related to computer science, it reads ‘A piece that makes up a whole, a part of an assembly’. Very abstract. In electronic component, it says ‘An electronic component is a basic electronic element usually packaged in a discrete form with two or more connecting leads or metallic pads. Components are intended to be connected together…’ This definition is more vivid to use as a metaphor here.

    In .net a class *IS* a component. In the extreme form, one can compile a .net class into a binary assembly. Then CLR can load it into an AppDomain of a process.
    From runtime process’ point of view, ‘traditional’ programming model/application is packaged to a monolithic binary block, regardless how it maps class diagram for business logic. Monolithic binary means they are tightly coupled. A change to one class can trigger a massive relinking of the entire application and necessitate retesting and redeployment of all other classes.

    In contrast, a .net component based application is a collection of binary building blocks grouped by functionality. Each block contains one or more classes. At run time, each block is loaded to an AppDomain, together, they make up a process. If one of the component needs to be update, changes are contained to that component only. No existing client of the component requires recompilation or redeployment. An updated component can even be updated while a client application is running, as long as the component isn’t currently being used.

    02 November 2006

    Create your custom xAnt task

    Here are some notes on how to extend ant task to provide your custom ant task.

    Both ant build (for Java) and nAnt build (for .net) are discussed.

    1. nAnt

    In nAnt for .net build you embedded c# code as script though semantically it is a derived class from Nant.Core.Task. (You don’t need to include Nant.Core assembly. It is loaded by default). A scripting block is a top level block, meaning side by side with <target> block.

    In following sample script., the first static c# function is a - function - to work out number of running processes by given name.
    The secnd task class is to kick off an external batch file - if you want the batch running in a separate process there isn't better way that this cumbersome one.
    The third task class is to kill a process.

    <script language="C#" prefix="custom">
    <code>
    <![CDATA[
    [Function("NumberOfRunningProcess")]
    public static int NumberOfRunningProcess(string name)
    {
    System.Diagnostics.Process[] procList = System.Diagnostics.Process.GetProcessesByName(name);
    return procList.Length;
    }

    [TaskName("WriteRunXspBatchScript")]
    public class WriteRunXspBatchScript: Task
    {
    private string _batchFilePath;
    private string _httpRootPath;
    private int _port;

    [TaskAttribute("XspRunScript", Required=true)]
    public string BatchFilePath
    {
    get{return _batchFilePath;}
    set{_batchFilePath=value;}
    }

    [TaskAttribute("HttpRootPath", Required=true)]
    public string HttpRootPath
    {
    get{return _httpRootPath;}
    set{_httpRootPath=value;}
    }

    [TaskAttribute("Port", Required=true)]
    public int HttpPort
    {
    get{return _port;}
    set{_port=value;}
    }

    protected override void ExecuteTask()
    {
    string cmd = string.Format("start /MIN xsp --root \"{0}\" --port {1}", _httpRootPath, _port);
    using (StreamWriter wr = new StreamWriter(_batchFilePath,false))
    {
    wr.WriteLine("@echo off");
    wr.WriteLine(cmd);
    }
    }
    }
    [TaskName("StopXsp")]
    public class StopXsp : Task{
    private bool _deleteXsp;
    private string _xspRunScript;

    [TaskAttribute("DeleteXspRunScript", Required=false)]
    public bool DeleteXspRunScript
    {
    get{return _deleteXsp;}
    set{_deleteXsp=value;}
    }

    [TaskAttribute("XspRunScript", Required=false)]
    public string XspRunScript
    {
    get{return _xspRunScript;}
    set{_xspRunScript=value;}
    }

    protected override void ExecuteTask() {
    System.Diagnostics.Process[] procList = System.Diagnostics.Process.GetProcessesByName("mono");
    if (procList==null )
    {
    throw new Exception("No Mono process found. Expect to kill one and only one mono xsp process");
    }
    if (procList.Length>1)
    {
    throw new Exception("More than one Mono processes is running. Expect to kill one and only one mono xsp process");
    }
    try
    {
    procList[0].Kill();
    }
    catch(Exception){;}

    if (_deleteXsp)
    {
    File.Delete(_xspRunScript);
    }
    }
    }
    ]]>
    </code>
    </script>


    Usage:
    <echo message="process devenv ${custom::NumberOfRunningProcess('devenv')}" />
    <WriteRunXspBatchScript Port="80" HttpRootPath="${webcontrolsUnitTest.src.dir}" XspRunScript="${build.dir}\${MonoXspRun}" />
    <StopXsp DeleteXspRunScript="true" XspRunScript="${build.dir}\${MonoXspRun}"/>

    2. ant
    Reference to Extending Ant to support interactive builds, to archive this you need to write external java classes, expose package via classpath by system envronment variable or via <path> in the build script.

    The only change to the sample code given in
    Extending Ant to support interactive builds is instead of using classpath, it uses <path> :
    <?xml version="1.0"?>
    <project name="PropertyPromptExample" default="main" basedir=".">
    <property name="promptTimeout" value="5"/>
    <path id="extendedTask">
    <fileset dir="c:\playpit\">
    <include name="monkeyNuts.jar"/>
    </fileset>
    </path>
    <taskdef name="propertyprompt" classname="com.ibm.samples.apache.tools.ant.taskdefs.optional.PropertyPrompt" classpathref="extendedTask"/>

    <target name="main">
    <!-- <javac srcdir="." destdir="." verbose="on"/> -->
    <property name="propA" value="oldValA"/>
    <property name="propA" value="oldValA1"/>
    <echo>value of propA: ${propA}</echo>
    <echo>value of propB: ${propB}</echo>
    <propertyprompt propertyname="propA" promptcharacter=":">Enter value for propA</propertyprompt>
    <propertyprompt propertyname="propB" defaultvalue="defvalB">What is the value for propB</propertyprompt>
    <echo>value of propA: ${propA}</echo>
    <echo>value of propB: ${propB}</echo>
    </target>
    </project>

    27 October 2006

    Export & Import Goodie from/to Photoshop


    Just finished my retrospective notes on Photoshop Action and Batch to watermark images then I think 'wait a minute, I have all these - custom shape custom action in one pc, how do I port it to another? I don't want to repeat the manual creation work again.

    It is a very simple task, a quick search found that IM Photography's tips: Installing and exporting Photoshop actions Likewise you can export and import custom shape by first select the shape, then click on the little play trangle at the top right corner to bring up the context menu, then select 'save shapes...'

    Photoshop Action and Batch to watermark images

    Jingye says: 'I am scratching my head on Photoshop tasks'. I am not a pro (digital) photographer. With busy life, I just want to get some reasonable quality picture from my digital cameras. I took many many photos during holidays (easliy over 5Gb for two weeks in a exotic country). I only have time to tidy them up a little bit, mostly an auto-leveling and an auto-curving. Then I will print some, upload a small size to flickr; archive a large version.

    Many ps tasks I have done in the pass were forgotten fast. So here I steal/rewrite from other people’s Photoshop tips/how to do something. I claim not rights of them unless stated. This is just my web notepad for myself and everyone else.’

    Photoshop Action and Batch to watermark images

    Rewrite and proved based on Chris Kitchener's Watermarking your photos in Photoshop 7 and CS technique ) and Watermarking Photos (batch)

    Objective:
    1) Create a reusable watermark.
    2) Create a custom action and use Photoshop’s batch command to process a group of images to apply watermark.

    Applicable versions
    :
    Photoshop CS (v8) and Photoshop v7

    Prep work
    :
    I used transparent watermark for protecting IP rights yet showing off pictures. I would try to make all images looked consistent when viewed as a collection-the size, effect, position etc. For this reason, I will resize all images to a certain size (see Using Photoshop Actions and batch command to resize images . Then group landscape and portrait photos in two source folder (i.e. source_landscape, source_portrait) 2) create two actions: e.g. ‘watermark Landscape’ ‘watermark portrait’.
    Create an ‘output’ folder as well.

    Task 1: Create an custom shape, which will be used as watermark later.
    At this stage there is no need to tweak the shape yet for special effect yet, just create a new document with plain text/logo. For example a square logo can be of Width: 3 inches x Height: 3 inches, Resolution: 300 pixels per inch (ppi) and the Colour Mode: Greyscale, Contents: White, Type the text with desired font and size it to fill all canvas.
    (important) Go to the 'Layer' menu, highlight 'Type' and select 'Create Work Path'. This action converts the text to an outline vector path. To add the shape the library, choose 'Define Custom Shape' from the "Edit' menu and name the item 'watermark'. Click 'OK'.

    Task 2: Create Watermark
    1) Open a test image, ideally this should be in similar size to those will be in batch process later, pick an image that it is not too dark around watermark application area. Also consider an watermark for lanscape and portrait images each. Here I will only give lanscape images as example.
    2) In the 'Preferences', check that the 'Units and Rulers' are set to 'Inches'. 'Units' set to 'Pixels' or 'Percent' create a watermark that changes size based on the files resolution and will prove unreliable.
    3) Add a new layer(shift+ctrl+n), nae it 'watermark'.
    3) From Toolbox, select 'Custom Shape Tool' (U), found under the 'Rectangle Tool'. Select 'watermark' shape from the listed icons.
    4) Hold 'shift' key and draw watermark on new layer to fill the entire width.
    5) (Layer menu) Rasterize->shape
    6) (Filter menu) Stylize->Emboss, angle 135
    7) (Layer menu), 'Layer Style' ->'Blending Options'. Set the layer blending mode to "Hard Light" to let the image show through
    8) Sets up the file and its attributes. (File menu)->File Info (Alt+Ctrl+i). Key in the information you want attached to the file.
    copyright info: Some rights reserve. Attribution-NoDerivs 2.0 UK: England & Wales You are free: to copy, distribute, display, and perform the work to make commercial use of the work(http://creativecommons.org/licenses/by-nd/2.0/uk/)
    9) Flatten the file.
    Watermark is done.

    Task 3: Record Task 2 as a custom action

    Close all working files. Now we ready to create an watermark action. Most of the steps in this task is repeat from task 2.

    1) Open an new image to be worked on.
    2) Create a new action. Click the “create new action” icon in the Actions panel.
    3) Name this Action “watermark lanscape image”. As soon as you create a new Action, your
    action starts recording.
    4) Repeat task 2 all steps
    5) stop recording
    5) Save image use 'save as' from File menu. Remember(very important): DO NOT rename the file; and save it to the target output folder that batch process is output to. (the reason for this two points are explained here: Using Photoshop Actions and batch command to resize images)
    5) Stop recording.
    6) Close working image,
    7) Open the original image. Test& re-recording “watermark lanscape image” action to satifaction.

    Task 4: Batch process all images
    1) In Photoshop, go to FILE --> AUTOMATE --> BATCH.
    In the Play section pull down "Action" and select "watermark lanscape image" action you created earlier.
    3) The “Source” Section. Since we did not create an “Open” Command in our Action, we need to make sure the “Override Action “Open” Commands” is NOT checked. The “Suppress file Open Options Dialog” should be checked. And the “Suppress Color Profile Warnings” should be checked.
    4) Click the “Choose” button and select the folder "source_landscape" you created in prep-work.
    5) The “Destination” Section. The “Destination” should be set to “Folder”. Click on the “Choose” button and select the folder you created called “output”. Make sure the “Override Action “Save As” command” is checked. Otherwise batch will create two identical files for each image – one named after original name (this is what action records in ‘save for web’) and the other name after the following pattern.
    6) In the “File Naming” Section. I prefer to prefix original image file name with something like ‘forWeb_’ just to differential it from original file. To do this Set the first box to ‘forWeb_’ second box to “Document Name” and the third box to “Extension”.
    7) uncheck 'Override Action "Save as" commands'
    8) Now, to process your images, just click “Ok”.
    And that’s it. (repeat this for protrait images)

    Photoshop Action and Batch to resize images

    Jingye says: 'I am scratching my head on Photoshop tasks'. I am not a pro (digital) photographer. With busy life, I just want to get some reasonable quality picture from my digital cameras. I took many many photos during holidays (easliy over 5Gb for two weeks in a exotic country). I only have time to tidy them up a little bit, mostly an auto-leveling and an auto-curving. Then I will print some, upload a small size to flickr; archive a large version.

    Many ps tasks I have done in the pass were forgotten fast. So here I steal/rewrite from other people’s Photoshop tips/how to do something. I claim not rights of them unless stated. This is just my web notepad for myself and everyone else.’


    Using Photoshop Actions and batch command to resize images.

    Rewrite and proved based on tsion (http://www.sitepoint.com/forums/showthread.php?t=252128 Apr 10, 2005, 10:38’s tutorial)

    Objective: Create a custom action and use Photoshop’s batch command to process a group of images to a certain size.
    Applicable versions: Photoshop CS (v8) and Photoshop v7
    Prep work: Resize will based on a certain axis, i.e. width/height. To maintain a consistent size of a collection of photos, it is better to 1) group landscape and portrait photos in two source folder (i.e. source_landscape, source_portrait) 2) create two actions: e.g. ‘resize to width 800’ ‘resize to height 800’.
    Create an ‘output’ folder as well.

    In the following walk though we will do ‘resize to width 800’ only, same principle apples to ‘resize to height 800’.

    1) Copy all landscape images you want to resize to the “source_landscape” folder.
    When you copy your images, I recommend you copy them all to the root directory in the “original” folder, don’t use any subfolders. This you’ll ensure that you have no duplicate images, or images with the same filename.

    Now we record custom automation action.

    2) In Photoshop, open an arbitrary image.
    3) Now, create a new action set. To do this, we click on the folder icon in the Actions panel. Let’s name this set “Custom”. I like to keep my custom actions in their own set, so I can find them easier later on.
    4) Next create a new action. Click the “create new action” icon in the Actions panel.
    5) Name this Action “resize to width 800” As soon as you create a new Action, your action starts recording.
    6) To resize the image: Go to IMAGE --> RESIZE IMAGE. This will open the “Image Size” dialog box. Now let’s change the width of our image to 800 pixels wide. Then click “OK”.
    7) Now immediately after you click “OK”. Go to FILE --> SAVE FOR WEB. Set your jpg parameters how you normally would and click save.
    Due to a bug in cs, there are two things described here must be follow:
    7.1 Make sure you save this file in the “output” folder that we created in prep work.
    7.2 DO NOT rename the file, just save it as it is. Otherwise you will get ‘Replace Files’ message window in batch process later for each image. (more below)

    8) Click the “Stop recording” icon in the Actions panel. Our new Action is complete, and ready to use.
    Now we are ready to process our images.

    9) Go to “output” folder and delete the image you saved there when you created your action. This is just so it doesn’t get mixed in with the images you’re processing.

    10) In Photoshop, go to FILE --> AUTOMATE --> BATCH.

    11) The “Play” section. Change your set to “Custom”. And your Action to ““resize to width 800” this sets the Action you created earlier.

    12) The “Source” Section. Since we did not create an “Open” Command in our Action, we need to make sure the “Override Action “Open” Commands” is NOT checked. The “Include Subfolders” option doesn’t matter. The “Suppress file Open Options Dialog” should be checked. And the “Suppress Color Profile Warnings” should be checked.

    13) Click the “Choose” button and select the folder "source_landscape" you created in prep-work.

    14) The “Destination” Section. The “Destination” should be set to “Folder”. Click on the “Choose” button and select the folder you created called “output”. Make sure the “Override Action “Save As” command” is checked. Otherwise batch will create two identical files for each image – one named after original name (this is what action records in ‘save for web’) and the other name after the following pattern.

    15) In the “File Naming” Section. I prefer to prefix original image file name with something like ‘forWeb_’ just to differential it from original file. To do this Set the first box to ‘forWeb_’ second box to “Document Name” and the third box to “Extension”.

    Now, to process your images, just click “Ok”.
    And that’s it.

    Question 1: When I run the batch command, PCS brings up the replace image dialogue asking me is I want to replace the previously saved image, which obviously I don't.
    What am I missing?

    Answer: First, the output folder in ‘resize to width 800’ action must be identical to what it is set in batch process output folder.
    Second, Do not rename the file in recording the action, this seemed like confused the batch process.

    Question 2: 'm trying to batch process ..alot of images...but everytime i run the batch, the picture quality appears after each image, asking me to save at what size. This is alot to go thorugh when i have thousands of pics, is there a way around this? So far from what i've seen, the answer is no.

    Answer: use ‘Save for web’, not ‘save as’

    23 October 2006

    Strong Typing vs. Strong Testing

    [Blog on Blog]

    ... without a full set of unit tests (at the very least), you can't guarantee the correctness of a program. To claim that the strong, static type checking constraints in C++, Java, or C# will prevent you from writing broken programs is clearly an illusion (you know this from personal experience). In fact, what we need is

    Strong testing, not strong typing.

    points to note:

    1. A very concise code sample comparing strong type and weak type language, where weak type loose the semantic on checking variable type – it works as long as it implements the method expected.
    2. unit test is an extension to complier

    03 October 2006

    mono XslTransform vs .net XslTransform observation

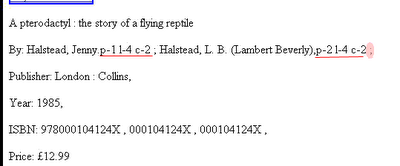
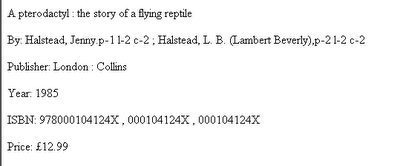
    Although by and large mono is the reincarnation of .net for the poor, there are subtle differences between them. Here is what I found on Xsl Transformation. Mono XML interprets xsl:last() function in a significant different way to native .net. XML.


    Using the same xml style sheet with a few debug trace: p – xsl:position(); l – xsl:last; c-xsl:count()
    Mono rendering:

    Native .Net rendering:

    And the source code:
    We also found the insignificant whitespaces in the two versions are placed differently.

    We are able to spot these difference in a consistent, repeatable and fully automated way by writing Ruby+Watier scripts before writing any code. The test script fully emulates an IE browser object. It instantiates an browser window and issues http request. We can then either assert the html source character by character or more semantically and interactively, do things like @ie(:id, "myLink").click

    15 September 2006

    update/delete/insert nodes to an xml document


    Load an xml document to memory. Nevigate the DOM object, using xpath to query nodes. To update the node: create an new one, and replace the existing one.
    Default namespace in xml doc still needs to declare in namespace mamager- and use in the xpath query. Although it is not present in the xml data:
    Sample Data

    C# Code to do this:
    private void SetTestData(int index, int itemsPerPage, int totalResults)
    {
    XmlTextReader reader = new XmlTextReader("..\\TestData_V1.xml");
    XmlDocument doc = new XmlDocument();
    doc.Load(reader);
    reader.Close();

    string osUri = "http://a9.com/-/spec/opensearch/1.1/";

    XmlNamespaceManager nsMgr = new XmlNamespaceManager(doc.NameTable);
    nsMgr.AddNamespace("os", osUri);
    nsMgr.AddNamespace("rdf", "http://www.w3.org/1999/02/22-rdf-syntax-ns#");
    nsMgr.AddNamespace("dc", "http://purl.org/dc/elements/1.1/");
    nsMgr.AddNamespace("rss", "http://purl.org/rss/1.0/");

    XmlNode oStartIndex, oItermsPerPage, oTotalResults;
    XmlElement root = doc.DocumentElement;

    oStartIndex = root.SelectSingleNode("/rdf:RDF/rss:channel/os:totalResults", nsMgr);
    oItermsPerPage = root.SelectSingleNode("/rdf:RDF/rss:channel/os:itemsPerPage", nsMgr);
    oTotalResults = root.SelectSingleNode("/rdf:RDF/rss:channel/os:startIndex", nsMgr);

    XmlElement nStartIndex = doc.CreateElement("os", "startIndex", osUri);
    XmlElement nItermsPerPage = doc.CreateElement("os", "itemsPerPage", osUri);
    XmlElement nTotalResults = doc.CreateElement("os", "totalResults", osUri);

    nStartIndex.InnerXml = index.ToString();
    nItermsPerPage.InnerXml = itemsPerPage.ToString();
    nTotalResults.InnerXml = totalResults.ToString();

    root.SelectSingleNode("/rdf:RDF/rss:channel", nsMgr).ReplaceChild(nStartIndex, oStartIndex);
    root.SelectSingleNode("/rdf:RDF/rss:channel", nsMgr).ReplaceChild(nItermsPerPage, oItermsPerPage);
    root.SelectSingleNode("/rdf:RDF/rss:channel", nsMgr).ReplaceChild(nTotalResults, oTotalResults);

    doc.Save("..\\tempTestData.xml");
    }

    02 September 2006

    The ASP.NET Page Object Model

    Revisit and take away from Dino Esposito's classic article The ASP.NET Page Object Model

    Code Behind

    The code of a page is the set of event handlers and helper methods that actually create the behavior of the page. This code can be defined inline using the tag or placed in an external class—the code-behind class.

    1. Think it this way make it easier to break away sequnential mentally on reading/writing code.
    2. Code behind is totally optional.
      1. You can have 'orphan' aspx page derived from web.UI.Page directly. In situations, say that you are testing good and feel of a web control
      2. You can have all aspx derived from a common code-behind class

    AutoEventWireup

    VSNET IDE wizard generates boiler-plate aspx contains @page like this

    <%@ Page language="c#" Codebehind="MyPage.aspx.cs" AutoEventWireup="false" Inherits="MyNameSpace.MyPage" %>

    For backward compatibility with the earlier VB programming style, ASP.NET also supports a form of implicit event hooking. By default, the page tries to match special method names with events; if a match is found, the method is considered a handler for the event. ASP.NET provides special recognition of six method names. They are Page_Init Page_Load, Page_DataBind, Page_PreRender, and Page_Unload. These methods are treated as handlers for the corresponding events exposed by the Page class. The HTTP run time will automatically bind these methods to page events saving developers from having to write the necessary glue code. For example, the method named Page_Load is wired to the page's Load event as if the following code was written.

    this.Load += new EventHandler(this.Page_Load);

    The automatic recognition of special names is a behavior under the control of the AutoEventWireup attribute of the @Page directive. If the attribute is set to false, any applications that wish to handle an event need to connect explicitly to the page event. Pages that don't use automatic event wire-up will get a slight performance boost by not having to do the extra work of matching names and events. Although VSNET creates aspx with the AutoEventWireup attribute disabled, the default setting for the attribute is true, meaning that methods such as Page_Load are recognized and bound to the associated event.

    You should always explicitly register an appropriate handler instead of relying on AutoEventWireup.

    Another interesting experitment. set AutoEventWireup="true" and also keep the following line in the InitializeComponent of code-behind. Put a Response.Write to it. It is called twice!

    this.Load += new System.EventHandler(this.Page_Load);

    The Page Lifecycle

    Stage Page Event Overridable method
    • Page initialization
    Init


    • View state loading

    LoadViewState Restores view-state information from a previous page request that was saved by the SaveViewState method

    • Postback data processing
    (implicitly by Page base class -ProcessPostData (private))
    Call to LoadPostData methods in the controls tree that implements the System.Web.UI.IPostBackDataHandler

    interface (e.g. TextBox)
    • Page loading
    Load

    • Postback change notification

    RaisePostDataChangedEvent method in any control that implements the IPostBackDataHandler interface

    • Postback event handling
    Any postback event defined by controls RaisePostBackEvent method in any control that implements the IPostBackEventHandler interface

    • Page pre-rendering phase
    PreRender


    • View state saving

    SaveViewState

    • Page rendering

    Render

    • Page unloading
    Unload

    The ProcessPostData is a private method implemeted at Page class which contains code like this:

    IPostBackDataHandler handler1 = (IPostBackDataHandler) control1;
    if (handler1.LoadPostData(text1, this._requestValueCollection))
    {
    this._changedPostDataConsumers.Add(handler1);
    }
    if (this._controlsRequiringPostBack != null)
    {
    this._controlsRequiringPostBack.Remove(text1);
    }

    A simple page to demo this cycle: PageLifeCycle.zip (contains PageLifeCycle.cs and .aspx, unzip and add them to a web proj. to see it in action)

    31 August 2006

    TDD web controls dev life cycle

    An entire upside down experience to help coder focus on deliver 'good enough' requirements

    In summary this dev pattern is

    1. decide deliverables - the rendered html as browser user sees. (step 1, 2)
    2. write ruby script to test the html (in fact it is reversed test the test script) (step 3)
    3. act as web designer to use the web control to build a test page (of course, the web control is not existed yet) (step 4)
    4. Implment web control (step 5)
    5. test the web control (step 6-7)
    6. change loop

    A well designed website should be broken into three domains:
    1) Reusable Web controls which render plain html
    2) bare bone website composed of web controls. Pages are served as control containers and responsible for managing navigation, user experience. It should contains no inline css but class/id/name that allows UI designer change the 'skin' without touching the website, not even a downtime.
    3) CSS

    Here is the Test Driven Development Cycle
    1. Agree with UI designer on html template. the static html prototype is the 'contract'.

    2. break down the template into componentised controls that will be generated with user/custom controls. Save the html corresponding to the control to a new html e.g. ~\gallery\searchbox.html
    <html>
    <body>
    <!--search box-->
    <div id="PARENTDIV" name="PARENTDIV" class="TestGlobalStyleClass">
    <label id="PARENTDIV.MessageLabel" name="PARENTDIV.MessageLabel">TestMessageLabelText</label><br>
    <input type="text" id="PARENTDIV.SearchTerm" name="PARENTDIV.SearchTerm" class="SearchTermClass" size="100" maxlength="100">
    <a href="http://test.webcontrols.com" id="PARENTDIV.AdvLink" name="PARENTDIV.AdvLink"
    title="Test ToolTip" class="AdvLinkClass">Test Link Text</a>
    <!--search box close--></div>
    </body>
    </html>

    3. Write an Ruby script 'SearchBoxTestFixture.rb' to test this template. This is to validate our test case is sounds.

    require 'watir'
    require 'test/unit'
    require 'test/unit/assertions'
    include Watir

    class SearchBoxTestFixture <>
    def setup
    localHostXSP = "http://127.0.0.1"
    localHostIIS = "http://localhost/Talis.Web.Cenote.WebControls.Test"
    @staticTemplate = 'http://localhost/Talis.Web.Cenote.WebControls.Test/static/searchbox.html'
    remoteHost = "http://talis.com";
    @testSite = localHostIIS
    @ie = IE.new
    end

    def teardown
    @ie.close
    end

    def test_allHtmlElementsExist
    # page = "SearchBoxTest.aspx"
    # @ie.goto(@testSite+'/'+page)

    # test static html template
    @ie.goto(@staticTemplate)

    assert_equal(1, @ie.divs.length, 'Expecting only one div')
    assert(@ie.div(:id, /PARENTDIV/).exists?, "Expecting div id 'PARENTDIV'")
    assert(@ie.div(:name, /PARENTDIV/).exists?, "Expecting div name 'PARENTDIV'")

    #assert message label
    assert_equal(1, @ie.labels.length, 'Expecting only one lable box')
    assert(@ie.label(:id, /PARENTDIV.MessageLabel/).exists?, "Expecting label id 'PARENTDIV.MessageLabel'")
    assert(@ie.label(:name, /PARENTDIV.MessageLabel/).exists?, "Expecting label name 'PARENTDIV.MessageLabel'" )
    assert('TestMessageLabelText', @ie.label(:id, "PARENTDIV.MessageLabel").innerText)

    #assert input box
    assert_equal(1, @ie.text_fields.length, 'Expecting only one input box')
    assert(@ie.div(:id, /PARENTDIV/).text_field(:id, 'PARENTDIV.SearchTerm').enabled?, "Expecting textbox id 'PARENTDIV.SearchTerm'" )
    assert(@ie.text_field(:name, 'PARENTDIV.SearchTerm').exists?, "Expecting textbox name'PARENTDIV.SearchTerm' textbox element")
    assert_equal(100, @ie.text_field(:id, 'PARENTDIV.SearchTerm').size(), "Expecting textbox size 100")
    assert_equal(100, @ie.text_field(:id, 'PARENTDIV.SearchTerm').maxLength(), "Expecting textbox maxLength 100")

    #assert link
    assert_equal(1, @ie.links.length, 'Expecting only one link')
    assert(@ie.link(:id, 'PARENTDIV.AdvLink').exists?, "Expecting link id 'PARENTDIV.AdvLink'" )
    assert(@ie.link(:name, /PARENTDIV.AdvLink/).exists?, "Expecting link name 'PARENTDIV.AdvLink'" )
    assert_equal('http://test.webcontrols.com/', @ie.link(:name, /PARENTDIV.AdvLink/).href, "Expecting link url 'http://test.webcontrols.com'" )
    assert(@ie.link(:title, 'Test ToolTip').exists?, "Expecting link title (tool tip) 'Test ToolTip'" )
    assert_equal('Test Link Text', @ie.link(:id, 'PARENTDIV.AdvLink').innerText, "Expecting link text 'Test Link Text'" )

    end
    end

    4. write SearchBoxTest.aspx that intend to render as to searchbox.html. Ours contains this:
    <My:SearchBox
    ID="PARENTDIV"
    Class="TestGlobalStyleClass"
    MessageLabel_Text="TestMessageLabelText"
    MessageLabel_Class="TestMessageLabelClass"
    SearchTerm_Class="SearchTermClass"
    SearchTerm_Size="100"
    AdvLink_Class="AdvLinkClass"
    AdvLink_Tooltip="Test ToolTip"
    AdvLink_InnerText="Test Link Text"
    Runat="server"
    />

    5. Implement the custom web control: SearchBox.cs

    6. If haven't done so, write nUnit Testfixture to hook* ruby script into your test dll. So all tests will feedback as red/green light

    7. Modify SearchBoxTestFixture.rb to target SearchBoxTest.rb.

    Contract changed, start from 1. again

    Notes:
    1. You need to install Ruby WATIR
    2. Travis Illig has this fatastic RubyTestExecutor integrates ruby and watir test scripts into nUnit test framework. Check his paper Integrated ASP.NET Web Application Testing with NUnit, Ruby, and Watir on code project.

    30 August 2006

    Mono is not an adaptive asp.net web rendering engine

    Scott Mitchell writes in ASP.NET.4GuysFromRolla.com: A Look at ASP.NET's Adaptive Rendering: IIS ASP.NET renders web controls by first detect the user-agnet type, for this reason, ASP.NET Web controls are called adaptive. By default it renders HTML 3.2-compliant markup using tagwriter=System.Web.UI.Html32TextWriter. For
    HTML 4.0-compliant agents (Mozilla/4.0 and above, e.g. MSIE6) it uses
    tagwriter=System.Web.UI.HtmlTextWriter. IIS does so by having a regex check for browser User-Agent. However, the default implementation doesn't address FireFox 0.8 and above, which is Mozilla/5.0 and HTML 4.0-compliant.
    Here we will check the adaptive rendering issue around Mono1.x ASPNET instead of IIS.

    Default behaviour
    1. Test rendering by Mono XSP web server.
    On MSIE 6.0: tagwriter=System.Web.UI.HtmlTextWriter
    evidence: System.Web.UI.WebControls.WebControl is rendered as <div>
    On FireFox 1.5: tagwriter=System.Web.UI.HtmlTextWriter
    evidence: System.Web.UI.WebControls.WebControl is rendered as <table >
    Mono1.1 doesn't address adaptive Rendering - there is no <browserCaps> in its machine.config

    2. Test rendering by IIS6
    On MSIE 6.0: tagwriter=System.Web.UI.HtmlTextWriter
    evidence: System.Web.UI.WebControls.WebControl is rendered as <div>
    On FireFox 1.5: tagwriter=System.Web.UI.Html32TextWriter
    evidence: System.Web.UI.WebControls.WebControl is rendered as <table ><tr><td>

    It seemed that Mono team get around the problem luckily because it was born at a time HTML 4.0-compliant browsers prevails. (At least it was what they thought?). But maybe we can still add <browserCaps> for backward adaptive? At least it looks straightforward enough to add Add <browserCaps> to web.config to enable mono becomes aptive.
    Not quite though.
    Checking native .net1.x machine.config, in <configuration><configSections> there is:
    <section name="browserCaps" type="System.Web.Configuration.HttpCapabilitiesSectionHandler, System.Web, Version=1.0.5000.0, Culture=neutral, PublicKeyToken=b03f5f7f11d50a3a"/>
    HttpCapabilitiesSectionHandler handles <browserCaps>. However, mono1.x build System.Web does NOT contain type HttpCapabilitiesSectionHandler implementation.

    Conclusion: Mono1.X is not an adaptive ASPNET rendering engine.

    Ideally we could add this to Web.config (affect single web app) or machine.config (affect all web apps on the machine)

    <configuration>
    ...
    <configSections>
    ...
    <sectionGroup name="system.web">
    <section name="browserCaps" type="System.Web.Configuration.HttpCapabilitiesSectionHandler , System.Web, Version=1.0.5000.0, Culture=neutral, PublicKeyToken=b03f5f7f11d50a3a"/>
    ...
    </sectionGroup>
    </configSections>
    <System.Web>
    ...
    <browserCaps>
    <!-- if (working on web.config) { copy all <browserCaps> section from machine.config} -->
    <!-- copy Rob Eberhardt's <browserCaps> (http://slingfive.com/pages/code/browserCaps/browserCaps_spaces.txt ) -->
    </browserCaps>
    ...
    </System.Web>

    Technorati Tags: MONO ASPNET

    27 August 2006

    Intellisense Nant Build Script on VSNET

    From Serge van den Oever
    1. Edit and save following build script to NAntGenerateSchema.build. This
    script is used to generate the nant.xsd for the Intellisense trick
    .
    <?xml version="1.0" encoding="utf-8" ?> <project
    name="GenerateNAntSchemaForVS.NET" default="genschema"> <property
    name="myVsNetRoot" value="C:\Program Files\Microsoft Visual Studio .NET 2003"
    /> <property name="nantSchema"
    value="${myVsnetRoot}\Common7\Packages\schemas\xml\NAnt.xsd"/> <target
    name="genschema"> <nantschema output="${nantSchema}" target-ns=" http://nant.sf.net/schemas/nant.xsd"/>
    </target> </project>

    1) update property myVsNetRoot to your VSNET install path.

    2) save this script as NAntGenerateSchema.build

    3) run "nant NAntGenerateSchema.build ' . This will download the latest nant schema from Source Forge to VSNET schema dir. Note: this script should be run when refreshing nant releases.

    2. Suppose you are working on HelloWorld.sln with VSNET, create a HelloWorld.build, which is your nant build script. Open HelloWorld.build in the IDE ((RC) by open with - HTML/XML Editor (set to default unless you need encoding).

    3. Open the properties window for HelloWorld.build, Select " http://nant.sf.net/schemas/nant.xsd" as TargetSchema.

    Job done.

    Technorati Tags: NANT VSNET

    26 August 2006

    nAnt build script to test mono web app with Ruby and Watir

    Download the build script template: myWebsite.build

    1. Prove nant task <csc>, <nunit2> works/doesn't work with mono
    build

    1. Prove test assembly is fine use vsnet (.net 1.1) build, reference *.net1.1*
      nunit.framework.dll , not the mono build.

      • build asm
      • tested with nUnit2.2.0 GUI exe
      • tested with nUnit-2.2.0-mono console exe.

      Both work as expected

    2. nAnt build. nant target mono-1.0; reference lib (nunit.framework.dll) set to NUnit-2.2.0-mono

      • test assembly with nUnit2.2.0 GUI exe. On loading asm it throws exception
        'This assembly was not built with the NUNIT framework and contains no tests'
        cases' on the popout message window
      • test assembly with nUnit-2.2.0-mono
        console exe. This returns:
        OS Version: Microsoft Windows NT 5.1.2600.0 .NET Version: 1.1.4322.2032 Tests run:
        0, Failures: 0, Not run: 0, Time: 0 seconds Open the assembly by .net
        reflector, surprise, surpise there is nothing in the dll
    2. Use mono mcs compiler
    1. compiles the source
      mcs -r:system.dll -r:\sslocal\Cenote.root\dependencies\NUnit-
      2.2.0-mono\bin\nunit.framework.dll -t:library SampleRubyTestFixture.cs

    2. test - test assembly with nUnit2.2.0 GUI exe. - test assembly with
      nUnit-2.2.0-mono console exe. - test assembly with nUnit2.2.8 GUI exe. All work
      as expected

    3. Open the assembly by .net reflector, it confirms that our test case is in there This confirms that nUnit2.2.* GUI exe doesn't discriminate mono build, as long as nunit.framework.dll is the .net1.1 compliance version This also confirms that the problem is not with nant task <nUnit2>, regardless which nunit build version it points to.
    3. Questioning nant task <csc>
    Before setting off to use task <exec> and mcs for the build, I have a few more go on task <csc>. Eventually it confirms that it was a bug in the <csc> task causes the problem.
    nAnt doesn't support multiple filesets or its derived types like assemblyfileset etc, which means you cann't resuse reference assemblyfileset. For building multiple projects in a build that each project has an inter-set to others, each <csc> needs to have a full list of <reference><include> dlls. A bit of pain. Using <module> is a hack. Though it solves the resuse problem on the surface, if you poke the assembly with Reflector, you will find there are modules should really be references. this is NOT the right way to reference <assemblyfileset>.
    <csc> ... <references refid="sys.assemblies " /> <modules>
    <include name="${webcontrols.output.Mono}\${webcontrolsNamespace}.dll" />
    <include name="${cenote.output.Mono}\${cenoteNamespace}.dll" />
    </modules> </csc>

    By the way, if declare <fileset>and its derived types like
    <assemblyfileset> at project level(doc root) it can take an id attribue
    and can be referenced from everywhere.
    4. <nunit2> and nUnit2.2.x GUI
    Leaving the bug in <csc> behind, I move into nant <target> unit
    test with <nunit2>. nunit2 used nunit-version=" 2.2.8.0"
    clr-version="2.0.50727.42" for the test. Passed. However, now the mono-target
    assemble is not loaded with nUnit2.2.X GUI, not even nUnit-2.2.0-mono console
    exe. An System.IO.FileNotFoundException is thrown, complaining test dll or its
    dependencies dlls are not found. [to-do] I will look into it later. This is not
    an issue for next step. (We only use nUnit gui for vsnet build)
    5. Serve web test using ruby+watir
    prerequisite: install Ruby
    engine and Watir library
    Watir offers a clean, well define, automated and scripting (in opposite to
    recording) base Web app test.
    Travis
    made a nice hook to integrate ruby script into nUnit test
    framework. It is not absolutely necessary to integrate ruby script into nUnit.
    *.rb script can run from cmd line. However, the integration leverage the
    reporting function comes with nUnit.
    1. compile RubyTestExecutor-1.1.3.0 to target nunit_2.2.0_mono
    2. Write a 'Hello World' test case as well as ruby script. In Nant task
      <csc>include them as embeded resource. <resources
      dynamicprefix="true"> <include name="...\*.rb" /> </resources>
    3. VSNET .net1.1 build and nUnit GUI test

      • in vsnet reference RubyTestExecutor-1.1.3.0_target_nunit_2.2.0
      • make sure the Web_Control_test_project is set to default web sharing. It
        contains test pages as well as test cases.
      • Postbuild action to copy test.dll and referenced dlls (except
        nUnit.framework.dll) from ~\bin\Debug to ~\bin
      • run tests

    4. VSNET mono1.0 build and nAnt build (test with <nunit2>, on my pc it picks
      the lastest nunit2.2.8 engine)

      • in nAnt build reference RubyTestExecutor-1.1.3.0_target_nunit_2.2.0_mono
      • compile, delpoy as usual
      • start XSP at Web_Control_test_project where pages live.
      • Both use port 80 for http request. This means we don't need to change ruby
        scripts for native 1.1 (which runs on IIS) or mono runtime (which runs XSP).
        Just need to stop/start IIS before XSP kicks start. (I argue it is more
        pragmatic then dynamic decide which port to use depends on runtime env)
    5 Conclusion
    With this build script, we archieve:
    • Implement, build and test ASP.Net Web Controls and Website in VSNET2003 IDE to
      target .Net 1.1 framework.
    • Use nAnt build script to link, compile, deploy the same code base to target
      Mono1.0. This build process needs to know nothing about the IDE build.
    • Use Ruby+Watir scripts to test web app in 'nearest' real way.The script test
      suite is seamlessly integrate into nUnit framework.
    6 What's more can be done?
    Automated XSP web server start/stop. The build process requires manually start
    mono XSP web server before <nunit2> tests. XSP must run in an isolated
    AppDomain/process from where nAnt is running from, so use <exec> task is
    not prossible. It is also not possible to use
    Application Domain
    ExecuteAssembly
    to create and load XSP into an
    isolated AppDomain because on Windows OS XSP requires mono runtime environment,
    which is unmanaged code. (Though XSP.exe is managed code.)

    Download the build script template: myWebsite.build

    Technorati Tags: nAnt

    20 August 2006

    TDD Mono asp.net web application on

    Note: (This is a dump as I play with the new tools on doing familiar TDD aka. Test Driven Development), work in progress.

    The application:
    An asp.net web application run on Linux Mono

    Requirement: Unit test web application UI.

    This is hard. NUNIT is designed for API (exe, lib) test

    Unit test server controls

    Support Continuous integration


    Tools for the trade:

    - VS.net IDE

    - NUnit (For this project we targeting asp.net 1.1, so pick NUnit 2.2 from the list)

    - Nant

    - Ruby

    - WATIR (I use watir-1.4.1.exe as at the time of writing)

    - Mono gtk, XSP web server


    Internal Resource:

    - Ruby test code template for vs.net

    - Water code template for vs.net (because I am lazy)


    Reference:

    Babysteps in WATIR A Jumpstart to Ruby/Watir

    Integrated ASP.NET Web Application Testing with NUnit, Ruby, and Watir Travis Illig creates a RubyTestExecutor to integrate Ruby/Watir Testscripts into nUnit framework. So test cases can be run from GUI like other nUnit test cases. However this is more of convenience that necessary. You still write Ruby/Watir scripts. You can still invoke them from command line.

    Introduction to Mono - Your first Mono app Happened to find this Primer


    Development pattern:


    Assumption: Coding in vs.net 2003, OS: winXP

    (One off task) Create web project

    1. create project directory: {root}\My.Hello.World
    2. Web share this folder
    3. create a new web project in vs.net, map it to My.Hello.World
    4. Execute Mono run time test. Bring up command line console and do nAnt build.
      a. Start Mono XSP web server
      b. nAnt target doesn't natively require nUnit, although it could leverage point 1-3.
      c. However, this is redundant. We can just load up Ruby and Watir script engines and call test scripts
    Technorati Tags: TDD RUBY WATIR NUNIT ASPNET

    15 August 2006

    svn external steps

    This quick note gives a step by stop guide to make svn external reference.
    svn external means that local copy is a references to repository rather than a working copy. So if later checking in would not check-in the local copy, but mark the reference only.
    1. {local path}mkdir dependencies. dependencies contains a collections of external denpendencise (references) we will import next.
    2. svn add dependencies {repository url}, and
    3. svn ci -m"..." dependencies. 2. 3. source controls 'dependencies'
    4. (use windows file browser), go to 'dependencies' |(right click)|Properties|Subverion tab| (requires Tortoise, the svn windows client)
    5. from the Subverion tab, select 'svn externals' from middle dropdown box, then in the text area below, type '3rdAPILib url_to_3rdAPILib' (no*'*, 3rdAPILib is the dir name you give to the external reference, url_to_3rdAPILib is its location in the repository)
    6. click 'set' button, then 'ok' it.
    7. right click 'dependencies'|'SVN Update'. This should get a copy of '3rdAPILib' to your {local path}\dependencies .
    Technorati Tags: <a href="http://technorati.com/tag/Subversion" rel="tag">Subversion</a> <a href=" http://technorati.com/tag/SVN" rel="tag">SVN</a>

    06 August 2006

    Google 1.0 vs Yahoo 2.0

    In the book The Search, John Battelle compares Yahoo and Google:


    "Yahoo makes no pretence of objectivity-it is clearly steering searchers toward its own editorial services, which it believes can satisfy the intent of the search. In effect, Yahoo is saying 'You're looking for stuff on Usher? We got stuff on Usher, and it's good stuff. Try what we suggest; we think it'll be worth your time."


    "Apparent in that sentiment lies a key distinction between Google and Yahoo. Yahoo is far more willing to have overt editorial and commercial agendas, and to let humans intervene in search results so as to create media that supports those agendas. Google, on the other hand, is repelled by the idea of becoming a content- or editorially driven company…they approach the task with vastly different stances. Google sees the problem as one that can be solved mainly through technology-clever algorithms and sheer computational horsepower will prevail. Humans enter the search picture only when algorithms fail and then only grudgingly."


    What Battelle makes is that Google's approach – using technology- 'the machine' and algorithm to solve indexing world's information. I tend to think of it as 'content based' search: index based on content text rather than the semantic meaning of it and search based on keyword appearances and PageRank to decide its weight.


    On the other hand Yahoo is taking an editorial approach on searching. It integrates human to drive search, helping searchers force on search intention. 'What you are really looking for?' By typing search keyword 'Usher' do you mean music artist Usher's lyrics or buying an Usher' music CD?


    In my opinion this intention based search is one step higher than content based search, though it intrinsically comes with scalability issue. How many people Yahoo needs to satisfy the world?


    Here is where Web 2.0 cutting in. The essence of Web 2.0 is collaborate and share information. Build social network by interaction of surfers. Web users self-govern, actively participate in virtual communities, engaging with each other. Web users can also help each other on driving intent based search using new emerging technology like tagging: Reading something interesting/disgusting? Right click the mouse on the page and throw in a keyword, which is then stored in an indexing machine (may well be from Yahoo or Google) together with the URL. On the back of this, the index machine scan and sort the tag with other tags that already add to this article (URL) and apply some smart algorithm…


    Technorati Tags:

    Content or intention?

    How does the news industry "cross the chasm" and survive in a search-driven world? I don't have a silver bullet, unfortunately, but it starts by opening up its sites and realizing that in a post-Web world, the model for news is no longer site driven. Sites that wall themselves off are becoming irrelevant, not because the writing or analysis is necessarily flawed, but rather because their business model is. In today's ecosystem of news, the greatest sin is to cut one-self off from the conversation. Both The Economist and the Wall Street Journal have done just that
    ...
    Remarking how traditional subscription based online media would be benefit from open up deep linking - allowing search and linking to their walled assert - subscription protected content:

    The goal is to make content that is worth pointing to. If you're feeding the conversation, the rest will then follow, including advertisers who want to be in the conversation that news stories are fostering.

    from The Search, John Battelle

    31 July 2006

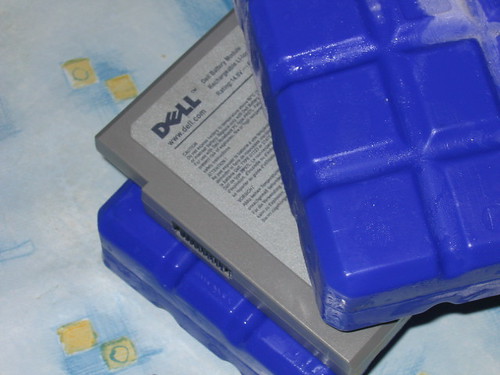
    Too hot


    Too hot, originally uploaded by shortcutexplorer.

    You know it is too hot when an laptop battery needs a cool down like this

    18 June 2006

    TDD Moving from 1.1 to 2.0

    Moving dev environement to VS 2005, which by default targets .Net framework 2.0. To make it targets 1.1 here is Jomo Fisher : Hack the Build: Use Whidbey Beta2 to target .NET Runtime 1.1, which works on VS 2005 full release as well.
    I organise test assembly into a project within the same solution. It is quit cool to have differnt project configured to different .net framework versions.
    So the class library(test target) is 2.0 while test fixture is 1.1, which statisfies nUnit console (2.2.0). Soon I run into chicken and egg problem - test asm reference test target - 1.1 on 2.0. Reverese dependency simply doesn't work.
    Luckily folks at nUnit.org didn't stop at when MS recuit one of their top guy and build a MS Unit Test into their VS Team Sytem. (I tried it in a few ocassion - awful I say).
    Quickly upgraded nUnit to 2.2.8 for .Net 2.0, put test asm back to 2.0. It works fine!

    06 June 2006

    How to perform a clean boot in Windows XP

    Over time, my computer getting slower on starting up. Happen to find this command MSConfig to the rescue.

    How to perform a clean boot in Windows XP: "How to perform a clean boot in Windows XP
    Note You must be logged on as an administrator or a member of the Administrators group to follow these steps. If your computer is connected to a network, network policy settings may also prevent you from follow these steps. 1.Click Start, click Run, type msconfig in the Open box, and then click OK.
    2.On the General tab, click Selective Startup, and then clear the Process System.ini File, Process WIn.ini File, and Load Startup Items check boxes. You cannot clear the Use Original Boot.ini check box.
    3.On the Services tab, select the Hide All Microsoft Services check box, and then click Disable All.
    4.Click OK, and then click Restart to restart your computer.
    5.After Windows starts, determine whether the symptoms still occur.

    Note Look closely at the General tab to make sure that the check boxes that you cleared are still cleared. Continue to step 6 if none of the check boxes are selected. If the Load System Services check box is the only disabled check box, your computer is not clean-booted. If additional check boxes are disabled and the issue is not resolved, you may require help from the manufacturer of the program that places a check mark back in Msconfig.

    If none of the check boxes are selected, and the issue is not resolved, you may have to repeat steps 1 through 5, but you may also have to clear the Load System Services check box on the General tab. This temporarily disables Microsoft services (such as, Networking, Plug and Play, Event Logging, and Error Reporting) and permanently deletes all restore points for the System Restore utility. Do not do this if you want to retain your restore points for System Restore or if you must use a Microsoft service to test the issue.
    6.Click Start, click Run, type msconfig in the Open box"

    08 February 2006

    Stealth Server (DNS)

    Chapter 1. Introduction: "You can list servers in the zone's top-level NS records that are not in the parent's NS delegation, but you cannot list servers in the parent's delegation that are not present at the zone's top level."

    - the beauty of flawless logic and phrase.