21 December 2007

using slide duplicator to 'scan' slide

At old school, slide duplicator is used to copy and make additional slide set from existing ones.
At new age, digitalise slides are done by using film scanner.
This is an attempt to do poor man's scanning: use a full frame DSLR to copy slides to raw then process to jpg etc. I am very pleased with the result.
It offers more control, dust control, and much faster.

This one is done by using slide duplicator:
Morning bath

This one is done by scanner:
Sikh Golden Temple

19 August 2007

Cleanig DSLR CMOS Sensor

There is one practical issue Digital Single Lenses Reflection Camera (DSLR) lost to ‘Analogue’ (Film) SLR is dust control. DSLR attracts and accumulates dust to its CCD/CMOS sensor. A dirty sensor casts greyish dots on the photo. Film camera doesn’t have a CCD sensor. When shutter opens, it exposes light-sensitive film. If there is no film loaded, no film to collect dust. So even if the maybe speck fells on the film, it will 1) washed away in developing; and 2) it wouldn’t be a lasting problem.

I have been suffering from this ‘dirty’ problem since I converted to DSLR. I use a few zoom lenses and swap them on times. In a sun-scorched, dusty tropical countryside mounting lenses is the best thing you could do to damage your DSLR,, which was assembled in a static-free lab.

I was getting-by with an incompetence bush blower in the past. Let camera camber face down while blowing air into it. I have even tried household vacuum cleaner – not to the extent stick it into the camber though. They just never went away. In fact I see more and more dots shown on the shoots.

Using Photoshop stamp tool to copy some pixels from neighbourhood is one way to get around the problem. Until there are just too many of them!

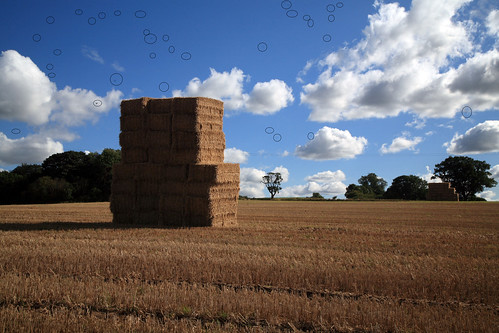
This photo was taken last Sunday with F-stop to F13, focus to more than 10 meters. It is just too dusty and too moral busty to be manually fixed (although I still did it). It made me decide to splash out on a proper cleaning kit.

Lots of Dust
link to a larger one

Here is the major steps:

  1. Blow off loose dust from the camber
  2. grab speck directly from the CCD sensor
  3. Use Pec Pad with ‘Eclipse 2’ solvent to wipe the sensor surface.


Here is tool list:

  • New Giottos Q Ball Air Dust Blower Puffer with Adj tube
  • Speck Grabber Pro cleaning tool for CCD's, optics etc
  • Eclipse E2 Cleaning Fluid for camera CCD Sensor
  • PEC PAD 10x10cm (100) Cleaning Wipes for Lens & Filters
  • Sensor Swab Type 3 (12Pk) For Canon, Kodak CCD Cleaning

In total it costs near £70 from eBay. Almost a third of a Canon DSLR 400D!

DSLR Sensor cleaning

Giottos Q Ball Air Dust Blower is very powerful but no as powerful as canned air, which spreads strong current may actually leaves an un-removable marks on the surface. There is an air inlet valve prevents backflow and dust coming to blower.

DSLR Sensor cleaning

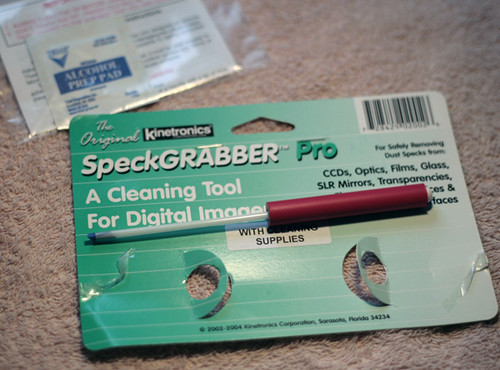
Speck Grabber is use to grab visible speck directly from delicate surface, such like reflection mirror, focus screen or CMOS sensor. It is an interesting tool. It has a tacky tip (the blue tip in the picture) made of copolymer plastic. Although it has tacky adhesion property, it doesn’t leave residue on the surface it touches.

For grabbing speck directly there are other competing products, such like a ‘Dust-Aid’. Very expensive though – around 35 pounds of 12 sticky pads.

DSLR Sensor cleaning

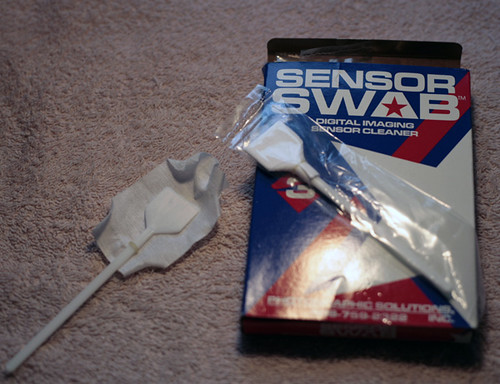
Sensor Swab is the most expensive one, costs £33. Any if you wonder what is in it – A sensor swab is a plastic wand wrapped with a Pec Pad tissue (1/3 sheet of it to be precise). Pec Pad is secured to the wand by a tiny elastic band. 12 units of Sensor Swab in the package, in individual seal package. So it works out to be around £2.75 a pot! IMO, this can only be justified by the made to size wand. it fits just right to the size of sensor surface, so one wipe stroke will be enough hence reduce the need of repeat wiping – which may let small speck to scratch & grind the ultra sensitive sensor.

DSLR Sensor cleaning
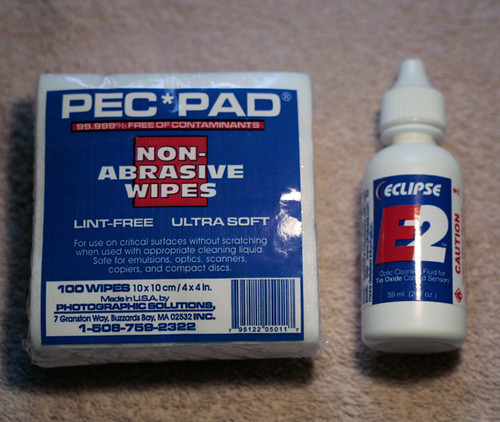
And finally lint –free Pec Pad and Eclipse 2 Optic Cleaning Fluid for Tin Oxide Coated Sensor.

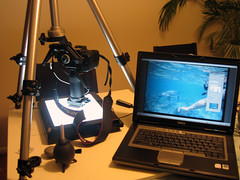
Now here is how to do it, reference to http://www.pbase.com/copperhill/image/71784128 on how to prepare a home made sensor swab and how to apply it in great detail. Read it for definitive guide and tips.

Before apply Sensor swab I have few more steps:

1. Cleaning mirror and focus screen. Though cleaning this has no effect on shots, it helps to a cleaner view finder and reduces the risk of loose dust move to sensor later.

  1. Un-mounted lenses but don’t switch on ‘cleaning sensor’ function or lifting up mirror.
  2. Camera face down, blow off loose dust from the camber. Be careful don’t let nozzle touch any element in the camber.
  3. Use SpeckGrabber to catch each visible dust particle. Must follow it’s user guide.

2. Cleaning CMOS sensor.

  1. Lifting up mirror by B-stop or ‘cleaning sensor’ function of the camera.
  2. Camera face down, use blower to blow off any loose dust speck.
  3. Use SpeckGrabber to catch visible dust particle.
  4. Use Sensor Swab to wipe clean the sensor, carefully.
  5. Mount the lenses and release the locked-up mirror.

This cleaning process may need to repeat to get the best result due to lenses mounting, locked-up mirror release could bring in ‘new’ specks.

If this is the case, in second run, you don’t need to clean mirror and focus screen again. So you should:

  1. Have every tool ready to use.
  2. While lenses is mounted, locked-up mirror or switch on ‘cleaning function’.
  3. Detached lenses
  4. Clean with SpeckGrabber if the new dust isn’t as serious as prevous.
  5. Use Swab

This is a photo I took (F22) after first run, there is a new speck introduced while ‘old’ ones had gone.

still one to go
Link to a large size

This is a photo I took after second run. No speck or greyish dust anymore.

no dust == world peace!
Link to a large size

World peace!

07 August 2007

Ely Cathedral


Ely Cathedral
Originally uploaded by Jingye
Lady's Chapel Ely Cathedral. Dedicated to Virgin Mary. The largest of its kind in Europe. All four walls are engraved with delicate statues, unfortunately, all have been defaced in 16th century.

I like the mysterious air set in this photo.

18 May 2007

Sikh Golden Temple


This photo has recently been selected as the winner of the theme ‘Tourist attractions from your travels’
by flickr group ‘The world though my eyes’ and blogged here.

‘This photo from the "tourist attraction" travel thread made a real impression on me. The tranquility, elegance and reverence of this shot is something to behold.’

I am thrilled and very happy.

You can see more photos of Sikh Golden Temple here

04 May 2007

Jetty 6.1.2 (rc2) don't do multi core processor

Recently we upgraded our work laptop to Intel dual core processor.

After moving my local working code branch to new pc, I start to see some very strange things happened. In some tests where the web server issues an httpClient call to itself hangs indefinitely. No time out; no response, the thread is just suspended.

In comparison, the very same code runs merrily on my old pc (single core), I can see the httpClient request invokes a new thread on itself.

Adding the mystery, the problem on dual core pc is intermittent- in about 20% occasion it starts a new thread.

Jetty doesn't spawn a new thread on multi core CPU. Looking back I can come to this conclusion but the process to get to here wasn’t easy. Then I google out this bug report

I quickly upgrading to Jetty 1.6.3 - the stable build just released, the problem've gone away.

22 April 2007

Macro Photography


0.005sec (1/200); f/13; Focal Length:105 mm; ISO Speed:640;Exposure Bias:0 EV;Flash fired; using 12 and 20mm extension tube

Received Kenko extension tube set this week. Today I have a play with it.


My favourite subject is ladybird. Though very small, it is a very beautiful beetle with bright red shell doted. The size–about 5-7mm-presents a serious challenge for macro photography.

Back earlier April, I used Macro function comes with the lenses for close up shooting, which can be manually focus (with moving camera back and forth) at around 0.45m distance. The finished shoots after crop and interpolation(up size of the digital image by calculated and filling the pixels) become blur at edges. This is understandable-the finished photo I used as desktop is actually 4 times the life size by digital up scaling, counting the actual projection size of the beetle on the CCD sensor(or film emersion) it is much smaller. Later I will show you image magnification ratio chart.


0.005sec (1/200); f/9; Focal Length:105 mm; ISO Speed:100;Exposure Bias:0 EV;Flash No; Using Macro function

It must be optical magnification to solve the problem properly rather than resize the digital image. There are few solutions around, such like use reverse ring to mount a 50mm lenses reversely. Use a bellow or an extension tube. Each solution has its pros and corns.


Reverse ring is the cheapest solution. you can pick up one from eBay for around £5 including postage from China. It exposed the lenses inside out, without proection to the lenses element it could be a hazardous. And of course you lost TTL metering and auto focus.

Bellow is the most flexible but quite bulky. It takes a platform with ruler and guiding rails. I feel it is not the best choose for field shooting. I saw one on eBay going for £160 with a compliment 50mm FD lenses. A new one without lenses shipped from China costs about 30 pounds includes p&p.

That leaves candidate extension tube. By mounting it ( or combine a few and) to camera body, then mount lenses to it, you have the balance of flexibility, portable and lenses protection.
There are two types of extension tubes around. The economical one costs around £10 pounds, it doesn’t come with electronic contact points, so the camera and your AF, TTL lenses are disconnected. The one I brought made by Kenko comes with build-in contact points, it relays the communication between lenses and camera body. So it retains TTL metering and auto focusing. Costs £55 pounds from HK. About the price I paid for a 50mm 1.8F prime lenses. Consider there is no lenses, no motor and no circuit board but just 3 aluminium rings, it is quite expensive.

shown with 12, 20 and 36mm extension tubes mounted (See the red dots behind the lenses?)

Anyway I am quite excited to have a new gadget under my belt.

Global warming speeds up this Spring. Back three weeks ago there are a lot of ladybirds around our garden, now they all seemed gone away. So it is very lucky I found a fella basking sun in the grass.

First I mounted a 25mm tube and set our little friend to a tulip leave. Didn’t use flash as the sunlight was still strong. Auto-focus is usable, but not very useful as the field of depth is very shallow regardless aperture: a little motion from the subject will mean refocusing. And the auto focusing is just not fast enough to cope. The strong wind didn’t help neither. With the magnifying effect from the tube, it renders subject violent movement.

After a few attempts, I retreated. Took my little model with the stem he is resting on and set the shooting studio over dinning table.

I use flash mounted with diffuser. First I try 25mm, then 25mm plus 12mm and finally 25mm plus 12mm plus 36mm. At the beginning I didn’t bother to set up tripod, thinking with speed at 1/200 and image stabiliser, it should be alright without – I was wrong, later I checked the photos and found there are compromised on quality.

With all three tubes mounted, the Maginification ratio increased to 6.1 for a 50mm lenses. I zoomed to around 100mm so the shake from the hands were even apparent. So a tripod is a must. In fact I use release cable and set the custom function to enable mirror lockup.


0.005sec (1/320); f/9; Focal Length:105 mm; ISO Speed:400; Exposure Bias:-1EV;Flash No; Using 20mm extension tube


0.005sec (1/320); f/9; Focal Length:105 mm; ISO Speed:400; Exposure Bias:-1EV;Flash fired; Using 12, 20 and 36mm extension tube

After shooting, I resize the photo to be the same as the CCD size - for Canon 5D it is 23.84 x 35.8mm then measure the beetle’s size then compares to it is actual size: 6mm. Here is the actual magnification ratio chart:
(Setup) (CCD Projection size) (Mag. ratio)

macro: 2.8mm 0.467

12,20 36mm ex.tube: 8.5mm 1.417 (approx.)

12 and 20mm ex.tube: 7.6mm 1.267

20mm ex.tube: 3.75mm 0.625 (approx.)

P.S. Also found Cannon 5D handles high ISO noise quite well. With noise reduction switch on, it only becomes visibly grainy at 1000 or above.

My close up shooting album.

29 January 2007

Custom configuration with nested collections in .Net 2.0

I am writing this as a brain dump.

Has been played around with .NET 2.0 strong type configuration this weekend (a bit late, I know). After some uneven drive-thanks to the lack of documentation- I finally produce a custom configuration file like the one below.

(For my work colleagues at Talis, yeah you - I know you will check my blog – If you are wondering why I am not using the time on our project for RDF Java configuration. Honestly, I do. I mean you absorb and learn from a competing technology, getting ideas from patterns, even the naming convention it uses – particularly there is Reflector for sneaking around.)

Here is the custom configuration setting with nested collection:
<section name="workflowConfig" type="Jingye.Workflow.Exe.WorkflowConfigSectionHandler,Workflow" />


<workflowConfig seperateProcesses="true" processWaitTime="50000">
<setup workingPath="c:\temp\" />
<workflow name="WorkflowOne" interval="15" dailyRun="true" startTime="09">
<task name="task1" onError="Abort"/>
<task name="task2" onError="Log" />
</workflow>
<workflow name="WorkflowTwo" interval="9999" dailyRun="true" startTime="08">
<task name="anotherTask1" onError="Abort"/>
<task name="anotherTask2" onError="Log" />
</workflow>
</workflowConfig>

Some well-known bits and bobs
1. Where is my config file?
For web app, this setting is in web.config. It will be picked up by ConfigutationManager as the default config file.
For console app or win service, you need to tell the Configuration about this file.
1) The short form. You app.exe.config file should be side by side with app.exe. Framework will ‘intelligently’ figure out the path and suffix ‘.config’ to the exe.
Configuration config = ConfigurationManager.OpenExeConfiguration("Workflow.exe");
WorkflowConfigSectionHandler scheduler = (WorkflowConfigSectionHandler)config.GetSection("workflowConfig");

2) The long form. The short form wraps this long form for convenient sake, but if you want to load a config from a different location or even pass in as command line argument, these are the lines to use

ExeConfigurationFileMap fileMap = new ExeConfigurationFileMap();
// relative path names possible
fileMap.ExeConfigFilename = @"c:\temp\exe\ConfigTest.exe.config";
// Open another config file
Configuration config =
ConfigurationManager.OpenMappedExeConfiguration(fileMap,
ConfigurationUserLevel.None);

//read/write from it as usual
ConfigurationSection mySection = config.GetSection("workflowConfig");

2. Your configuration section - the root derives from System.Configuration.ConfigurationSection. Back in .Net 1.x era, this is traditionally called XXXXHandler as it implements IConfigurationSectionHandler interface.

3. Each configuration element is declared as class derives from ConfigurationElement. Configuration element can have child elements, again derives from ConfigurationElement.

4. Configration elements take attributes/properties - decorates class properties with ConfigurationProperty. However configuration element doesn’t take CDATA text as body.

[ConfigurationProperty("seperateProcesses", DefaultValue = "true", IsRequired = false, IsDefaultCollection = true)]

5. Assign a key property in ConfigurationPropertyAttribute decoration. Such like ‘name’. You will need this to locate your configuration element in a MAP.

6. If a config element is a collection such like this, you also need to implement a façade to manage access to each member, this MyConfigElementCollection class is derived from ConfigurationElementCollection class.

Less well-known bits about MyConfigElementCollection class

1. By default, MyConfigElementCollection uses AddRemoveClearMap as its merging semantics – meaning how machine.config and your web.config or app.exe.config should merge together.
You can override this to be BasicMap or AddRemoveClearMapAlternate or BasicMapAlternate. Mark Gabarra discusses each of this merging semantic in his blog “.Net Configuration Default Behaviour”, worth a read if you are wondering ‘how could I stop downstream config changes my setting?’

public override ConfigurationElementCollectionType CollectionType
{
get{ return ConfigurationElementCollectionType.BasicMap;}
}


2. Override ElementName, if you are not using AddRemoveClearMap or just find another ‘<add>’ being confusing to the guy actually uses your app.
By default, ElementName is “” (String.Empty), because in AddRemoveClearMapAlternate semantic, elements should be view as ‘operation instructions’ – add, remove or clear an element. The real name of the element is passed in the strong typing context, hence anonymous is acceptable. Nevertheless, it is less self-describing to the user.
protected override string ElementName
{ get { return "workflow"; } }

3. In the parent element, where an instance of this element or a collection of this elements is declared, give the default name – “” as the name in ConfigurationProperty.
[ConfigurationProperty("", IsRequired = false, IsDefaultCollection = true)]
public WorkflowConfigElementCollection Workflows
{
get
{ return (WorkflowConfigElementCollection)base[""]; }
set
{ base[""] = value; }
}

I find this is confusing at the beginning, but if link back to point 2, it all make sense on how reflection and serialization works.

Reference:
Mark Gabarra, blog “.Net Configuration Default Behaviour
Jason Diamond blogs on using call back custom validator: Custom Configuration Validator Weirdness
Alois Kraus: Read/Write App.Config with NET 2.0

11 January 2007

Five things

Five Things about you and five firends of yours

Admit that it is hard for me to come with five friends who blogg, this is difficult. And my Talisian colleagues are moving fast – I would say although your colleagues are your friends (at least in theory), you are not meant to tag them as this spirals into a workspace dead loop.
Now I am pulling my hair for the five coz Rob exhausts (almost) all work-bloggers I know, thanks also goes to Ian (internet alchemy) D too. No, nil, zero, no one (Andy, I leave Sarah to your account).

So if you wonder who this quietly Jingye is, here is the five of him:

  1. I got to gym at least five times a week, do a 5km/30mins run before finishing the day.
  2. I consume around 500 minutes podcast each week, mostly IT and digital photography related. My most favourite is BBC documentary archives and the least favourite is IBM Institute for Business Value.
  3. Danni, my wife and I have recently completed a 25 km charity walk for British Heart Foundation at the Peak District.
  4. My latest gadget is a Canon 5D digital camera. Here is one (more are in my flickr).
  5. I organise outdoor activities for the alike Chinese expats in Britain. Our next call is ‘Winter Farm Experience’ at Lake District.

Stafford - Baswich

And here are five friends of mine: mumu, xp, flywhc, TheTime, Sisyphus