27 October 2006

Export & Import Goodie from/to Photoshop


Just finished my retrospective notes on Photoshop Action and Batch to watermark images then I think 'wait a minute, I have all these - custom shape custom action in one pc, how do I port it to another? I don't want to repeat the manual creation work again.

It is a very simple task, a quick search found that IM Photography's tips: Installing and exporting Photoshop actions Likewise you can export and import custom shape by first select the shape, then click on the little play trangle at the top right corner to bring up the context menu, then select 'save shapes...'

Photoshop Action and Batch to watermark images

Jingye says: 'I am scratching my head on Photoshop tasks'. I am not a pro (digital) photographer. With busy life, I just want to get some reasonable quality picture from my digital cameras. I took many many photos during holidays (easliy over 5Gb for two weeks in a exotic country). I only have time to tidy them up a little bit, mostly an auto-leveling and an auto-curving. Then I will print some, upload a small size to flickr; archive a large version.

Many ps tasks I have done in the pass were forgotten fast. So here I steal/rewrite from other people’s Photoshop tips/how to do something. I claim not rights of them unless stated. This is just my web notepad for myself and everyone else.’

Photoshop Action and Batch to watermark images

Rewrite and proved based on Chris Kitchener's Watermarking your photos in Photoshop 7 and CS technique ) and Watermarking Photos (batch)

Objective:
1) Create a reusable watermark.
2) Create a custom action and use Photoshop’s batch command to process a group of images to apply watermark.

Applicable versions
:
Photoshop CS (v8) and Photoshop v7

Prep work
:
I used transparent watermark for protecting IP rights yet showing off pictures. I would try to make all images looked consistent when viewed as a collection-the size, effect, position etc. For this reason, I will resize all images to a certain size (see Using Photoshop Actions and batch command to resize images . Then group landscape and portrait photos in two source folder (i.e. source_landscape, source_portrait) 2) create two actions: e.g. ‘watermark Landscape’ ‘watermark portrait’.
Create an ‘output’ folder as well.

Task 1: Create an custom shape, which will be used as watermark later.
At this stage there is no need to tweak the shape yet for special effect yet, just create a new document with plain text/logo. For example a square logo can be of Width: 3 inches x Height: 3 inches, Resolution: 300 pixels per inch (ppi) and the Colour Mode: Greyscale, Contents: White, Type the text with desired font and size it to fill all canvas.
(important) Go to the 'Layer' menu, highlight 'Type' and select 'Create Work Path'. This action converts the text to an outline vector path. To add the shape the library, choose 'Define Custom Shape' from the "Edit' menu and name the item 'watermark'. Click 'OK'.

Task 2: Create Watermark
1) Open a test image, ideally this should be in similar size to those will be in batch process later, pick an image that it is not too dark around watermark application area. Also consider an watermark for lanscape and portrait images each. Here I will only give lanscape images as example.
2) In the 'Preferences', check that the 'Units and Rulers' are set to 'Inches'. 'Units' set to 'Pixels' or 'Percent' create a watermark that changes size based on the files resolution and will prove unreliable.
3) Add a new layer(shift+ctrl+n), nae it 'watermark'.
3) From Toolbox, select 'Custom Shape Tool' (U), found under the 'Rectangle Tool'. Select 'watermark' shape from the listed icons.
4) Hold 'shift' key and draw watermark on new layer to fill the entire width.
5) (Layer menu) Rasterize->shape
6) (Filter menu) Stylize->Emboss, angle 135
7) (Layer menu), 'Layer Style' ->'Blending Options'. Set the layer blending mode to "Hard Light" to let the image show through
8) Sets up the file and its attributes. (File menu)->File Info (Alt+Ctrl+i). Key in the information you want attached to the file.
copyright info: Some rights reserve. Attribution-NoDerivs 2.0 UK: England & Wales You are free: to copy, distribute, display, and perform the work to make commercial use of the work(http://creativecommons.org/licenses/by-nd/2.0/uk/)
9) Flatten the file.
Watermark is done.

Task 3: Record Task 2 as a custom action

Close all working files. Now we ready to create an watermark action. Most of the steps in this task is repeat from task 2.

1) Open an new image to be worked on.
2) Create a new action. Click the “create new action” icon in the Actions panel.
3) Name this Action “watermark lanscape image”. As soon as you create a new Action, your
action starts recording.
4) Repeat task 2 all steps
5) stop recording
5) Save image use 'save as' from File menu. Remember(very important): DO NOT rename the file; and save it to the target output folder that batch process is output to. (the reason for this two points are explained here: Using Photoshop Actions and batch command to resize images)
5) Stop recording.
6) Close working image,
7) Open the original image. Test& re-recording “watermark lanscape image” action to satifaction.

Task 4: Batch process all images
1) In Photoshop, go to FILE --> AUTOMATE --> BATCH.
In the Play section pull down "Action" and select "watermark lanscape image" action you created earlier.
3) The “Source” Section. Since we did not create an “Open” Command in our Action, we need to make sure the “Override Action “Open” Commands” is NOT checked. The “Suppress file Open Options Dialog” should be checked. And the “Suppress Color Profile Warnings” should be checked.
4) Click the “Choose” button and select the folder "source_landscape" you created in prep-work.
5) The “Destination” Section. The “Destination” should be set to “Folder”. Click on the “Choose” button and select the folder you created called “output”. Make sure the “Override Action “Save As” command” is checked. Otherwise batch will create two identical files for each image – one named after original name (this is what action records in ‘save for web’) and the other name after the following pattern.
6) In the “File Naming” Section. I prefer to prefix original image file name with something like ‘forWeb_’ just to differential it from original file. To do this Set the first box to ‘forWeb_’ second box to “Document Name” and the third box to “Extension”.
7) uncheck 'Override Action "Save as" commands'
8) Now, to process your images, just click “Ok”.
And that’s it. (repeat this for protrait images)

Photoshop Action and Batch to resize images

Jingye says: 'I am scratching my head on Photoshop tasks'. I am not a pro (digital) photographer. With busy life, I just want to get some reasonable quality picture from my digital cameras. I took many many photos during holidays (easliy over 5Gb for two weeks in a exotic country). I only have time to tidy them up a little bit, mostly an auto-leveling and an auto-curving. Then I will print some, upload a small size to flickr; archive a large version.

Many ps tasks I have done in the pass were forgotten fast. So here I steal/rewrite from other people’s Photoshop tips/how to do something. I claim not rights of them unless stated. This is just my web notepad for myself and everyone else.’


Using Photoshop Actions and batch command to resize images.

Rewrite and proved based on tsion (http://www.sitepoint.com/forums/showthread.php?t=252128 Apr 10, 2005, 10:38’s tutorial)

Objective: Create a custom action and use Photoshop’s batch command to process a group of images to a certain size.
Applicable versions: Photoshop CS (v8) and Photoshop v7
Prep work: Resize will based on a certain axis, i.e. width/height. To maintain a consistent size of a collection of photos, it is better to 1) group landscape and portrait photos in two source folder (i.e. source_landscape, source_portrait) 2) create two actions: e.g. ‘resize to width 800’ ‘resize to height 800’.
Create an ‘output’ folder as well.

In the following walk though we will do ‘resize to width 800’ only, same principle apples to ‘resize to height 800’.

1) Copy all landscape images you want to resize to the “source_landscape” folder.
When you copy your images, I recommend you copy them all to the root directory in the “original” folder, don’t use any subfolders. This you’ll ensure that you have no duplicate images, or images with the same filename.

Now we record custom automation action.

2) In Photoshop, open an arbitrary image.
3) Now, create a new action set. To do this, we click on the folder icon in the Actions panel. Let’s name this set “Custom”. I like to keep my custom actions in their own set, so I can find them easier later on.
4) Next create a new action. Click the “create new action” icon in the Actions panel.
5) Name this Action “resize to width 800” As soon as you create a new Action, your action starts recording.
6) To resize the image: Go to IMAGE --> RESIZE IMAGE. This will open the “Image Size” dialog box. Now let’s change the width of our image to 800 pixels wide. Then click “OK”.
7) Now immediately after you click “OK”. Go to FILE --> SAVE FOR WEB. Set your jpg parameters how you normally would and click save.
Due to a bug in cs, there are two things described here must be follow:
7.1 Make sure you save this file in the “output” folder that we created in prep work.
7.2 DO NOT rename the file, just save it as it is. Otherwise you will get ‘Replace Files’ message window in batch process later for each image. (more below)

8) Click the “Stop recording” icon in the Actions panel. Our new Action is complete, and ready to use.
Now we are ready to process our images.

9) Go to “output” folder and delete the image you saved there when you created your action. This is just so it doesn’t get mixed in with the images you’re processing.

10) In Photoshop, go to FILE --> AUTOMATE --> BATCH.

11) The “Play” section. Change your set to “Custom”. And your Action to ““resize to width 800” this sets the Action you created earlier.

12) The “Source” Section. Since we did not create an “Open” Command in our Action, we need to make sure the “Override Action “Open” Commands” is NOT checked. The “Include Subfolders” option doesn’t matter. The “Suppress file Open Options Dialog” should be checked. And the “Suppress Color Profile Warnings” should be checked.

13) Click the “Choose” button and select the folder "source_landscape" you created in prep-work.

14) The “Destination” Section. The “Destination” should be set to “Folder”. Click on the “Choose” button and select the folder you created called “output”. Make sure the “Override Action “Save As” command” is checked. Otherwise batch will create two identical files for each image – one named after original name (this is what action records in ‘save for web’) and the other name after the following pattern.

15) In the “File Naming” Section. I prefer to prefix original image file name with something like ‘forWeb_’ just to differential it from original file. To do this Set the first box to ‘forWeb_’ second box to “Document Name” and the third box to “Extension”.

Now, to process your images, just click “Ok”.
And that’s it.

Question 1: When I run the batch command, PCS brings up the replace image dialogue asking me is I want to replace the previously saved image, which obviously I don't.
What am I missing?

Answer: First, the output folder in ‘resize to width 800’ action must be identical to what it is set in batch process output folder.
Second, Do not rename the file in recording the action, this seemed like confused the batch process.

Question 2: 'm trying to batch process ..alot of images...but everytime i run the batch, the picture quality appears after each image, asking me to save at what size. This is alot to go thorugh when i have thousands of pics, is there a way around this? So far from what i've seen, the answer is no.

Answer: use ‘Save for web’, not ‘save as’

23 October 2006

Strong Typing vs. Strong Testing

[Blog on Blog]

... without a full set of unit tests (at the very least), you can't guarantee the correctness of a program. To claim that the strong, static type checking constraints in C++, Java, or C# will prevent you from writing broken programs is clearly an illusion (you know this from personal experience). In fact, what we need is

Strong testing, not strong typing.

points to note:

  1. A very concise code sample comparing strong type and weak type language, where weak type loose the semantic on checking variable type – it works as long as it implements the method expected.
  2. unit test is an extension to complier

03 October 2006

mono XslTransform vs .net XslTransform observation

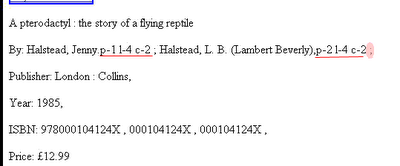
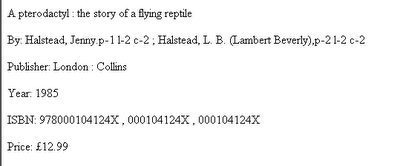
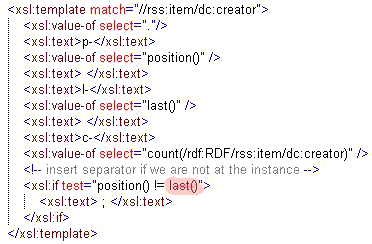
Although by and large mono is the reincarnation of .net for the poor, there are subtle differences between them. Here is what I found on Xsl Transformation. Mono XML interprets xsl:last() function in a significant different way to native .net. XML.


Using the same xml style sheet with a few debug trace: p – xsl:position(); l – xsl:last; c-xsl:count()
Mono rendering:

Native .Net rendering:

And the source code:
We also found the insignificant whitespaces in the two versions are placed differently.

We are able to spot these difference in a consistent, repeatable and fully automated way by writing Ruby+Watier scripts before writing any code. The test script fully emulates an IE browser object. It instantiates an browser window and issues http request. We can then either assert the html source character by character or more semantically and interactively, do things like @ie(:id, "myLink").click