26 January 2008

Almost missed the flight to Hong Kong

It was the big day yesterday. The family, Ryan (5 months) Danni my wife and me was on a long haul fight from London to Hong Kong then en-route to China to see the family there. To get to the Gatwick airport, we need to take express train from home station.

Once a few years back, I have some bad experience on rail travel to this airport. The distance is so long, it involves at least one connection, maybe two or three if need to going to central London first. In that incident, the delayed railway work had many train services cancelled, and we had been delayed at the start of the trip – then a chain of delays had we missed the fight when were finally at the airport although we leave a plenty of time for the travel.

The Deja Vu was back this time. We almost miss the flight yesterday.

We arrived at train station at 18 minutes before it arrived. Two huge luggage, three pieces hand carried bags, Ryan and his buggy were unloaded from the taxi. Did I say three? Wait, ‘honey, do you see my laptop bag?’

The bag with laptop and other important things was left at home. Without them I have to cut short my hols, and buy another ticket home in two weeks time. Panic, in a very desperate attempt, Danni, Ryan and a suitcase were left at the platform, put one rucksack back, and I was drove home with the taxi to get the bag.

It 9s about 10-15 minute one way drive from home to the station in a clear traffic. This time it was very busy, the lunch hour. A lorry and a wagon joined up in front, every traffic light turned into red when we up to it. Radio reported midday, 12 minutes before the train arrives on half way to my home.

I didn't know how Danni would handle things neither: buggy, a huge suitcase (38KG) and Ryan. Some passed-by help her to move the suitcase into the station concourse. But then and she needs to draw some cash from outside station and collect tickets from fast ticket machine. I thought I am going to miss them.

Taxi pulled stop at a near exit it may make it a minute or two quicker than if drove up. I ran the shortcut uphill to collect the bag, locked the door. The heart was beating so fast, and the hand is so shaky I dropped the key when locking the door. Ran the short cut to meet the taxi, and we back.

When I daring enough to look at the time. The dashboard display was showing an airbag warning so the time is not showing. Maybe that was not a bad news after all.

The train arrived just when the taxi waiting for oncoming traffic so to turn right on the road and got into station. Then I found I have no money to pay the additional taxi fare. I have got only got a fiver, which paid to the driver already - with additional round trip - I have got no money. That is why I need Danni to get some cash.

On Phone asked Danni to get onboard first. With so many things, it was just nightmare to move things on its own. Danni asked a staff member to hold the train for 1 minute. Replied 'Sorry madam, I can’t hold a train'. It was a virgin west coast fast train. i think probably he could if it was a slower local train. They went onboard without waiting

I told the driver the embarrassing truth before she pulled stop and I slam the door open. She let me off although not very happy - I won't blame her. I thanked her very much and promised will pay back once I am back.

Got the laptop bag, and cuddling the other huge rucksack from the boot, desperately run to the platform. Luckily it was at platform 1, so no need to jump down rail track or run through the passenger bridge.

The train was still there, first class door was still open, right in front. Before I dove into the coach, I asked the staff 'Are they on?' he smiled and nodded, ‘Yes, they have’.

The train was 2 minutes late, and probably been hold for 15 or 30 sec.

Danni was very cool in the situation, and Ryan was very helpful, no crying whatsoever. When they were on, Danni found him had already napped away.

21 December 2007

using slide duplicator to 'scan' slide

At old school, slide duplicator is used to copy and make additional slide set from existing ones.
At new age, digitalise slides are done by using film scanner.
This is an attempt to do poor man's scanning: use a full frame DSLR to copy slides to raw then process to jpg etc. I am very pleased with the result.
It offers more control, dust control, and much faster.

This one is done by using slide duplicator:
Morning bath

This one is done by scanner:
Sikh Golden Temple

19 August 2007

Cleanig DSLR CMOS Sensor

There is one practical issue Digital Single Lenses Reflection Camera (DSLR) lost to ‘Analogue’ (Film) SLR is dust control. DSLR attracts and accumulates dust to its CCD/CMOS sensor. A dirty sensor casts greyish dots on the photo. Film camera doesn’t have a CCD sensor. When shutter opens, it exposes light-sensitive film. If there is no film loaded, no film to collect dust. So even if the maybe speck fells on the film, it will 1) washed away in developing; and 2) it wouldn’t be a lasting problem.

I have been suffering from this ‘dirty’ problem since I converted to DSLR. I use a few zoom lenses and swap them on times. In a sun-scorched, dusty tropical countryside mounting lenses is the best thing you could do to damage your DSLR,, which was assembled in a static-free lab.

I was getting-by with an incompetence bush blower in the past. Let camera camber face down while blowing air into it. I have even tried household vacuum cleaner – not to the extent stick it into the camber though. They just never went away. In fact I see more and more dots shown on the shoots.

Using Photoshop stamp tool to copy some pixels from neighbourhood is one way to get around the problem. Until there are just too many of them!

This photo was taken last Sunday with F-stop to F13, focus to more than 10 meters. It is just too dusty and too moral busty to be manually fixed (although I still did it). It made me decide to splash out on a proper cleaning kit.

Lots of Dust
link to a larger one

Here is the major steps:

  1. Blow off loose dust from the camber
  2. grab speck directly from the CCD sensor
  3. Use Pec Pad with ‘Eclipse 2’ solvent to wipe the sensor surface.


Here is tool list:

  • New Giottos Q Ball Air Dust Blower Puffer with Adj tube
  • Speck Grabber Pro cleaning tool for CCD's, optics etc
  • Eclipse E2 Cleaning Fluid for camera CCD Sensor
  • PEC PAD 10x10cm (100) Cleaning Wipes for Lens & Filters
  • Sensor Swab Type 3 (12Pk) For Canon, Kodak CCD Cleaning

In total it costs near £70 from eBay. Almost a third of a Canon DSLR 400D!

DSLR Sensor cleaning

Giottos Q Ball Air Dust Blower is very powerful but no as powerful as canned air, which spreads strong current may actually leaves an un-removable marks on the surface. There is an air inlet valve prevents backflow and dust coming to blower.

DSLR Sensor cleaning

Speck Grabber is use to grab visible speck directly from delicate surface, such like reflection mirror, focus screen or CMOS sensor. It is an interesting tool. It has a tacky tip (the blue tip in the picture) made of copolymer plastic. Although it has tacky adhesion property, it doesn’t leave residue on the surface it touches.

For grabbing speck directly there are other competing products, such like a ‘Dust-Aid’. Very expensive though – around 35 pounds of 12 sticky pads.

DSLR Sensor cleaning

Sensor Swab is the most expensive one, costs £33. Any if you wonder what is in it – A sensor swab is a plastic wand wrapped with a Pec Pad tissue (1/3 sheet of it to be precise). Pec Pad is secured to the wand by a tiny elastic band. 12 units of Sensor Swab in the package, in individual seal package. So it works out to be around £2.75 a pot! IMO, this can only be justified by the made to size wand. it fits just right to the size of sensor surface, so one wipe stroke will be enough hence reduce the need of repeat wiping – which may let small speck to scratch & grind the ultra sensitive sensor.

DSLR Sensor cleaning
And finally lint –free Pec Pad and Eclipse 2 Optic Cleaning Fluid for Tin Oxide Coated Sensor.

Now here is how to do it, reference to http://www.pbase.com/copperhill/image/71784128 on how to prepare a home made sensor swab and how to apply it in great detail. Read it for definitive guide and tips.

Before apply Sensor swab I have few more steps:

1. Cleaning mirror and focus screen. Though cleaning this has no effect on shots, it helps to a cleaner view finder and reduces the risk of loose dust move to sensor later.

  1. Un-mounted lenses but don’t switch on ‘cleaning sensor’ function or lifting up mirror.
  2. Camera face down, blow off loose dust from the camber. Be careful don’t let nozzle touch any element in the camber.
  3. Use SpeckGrabber to catch each visible dust particle. Must follow it’s user guide.

2. Cleaning CMOS sensor.

  1. Lifting up mirror by B-stop or ‘cleaning sensor’ function of the camera.
  2. Camera face down, use blower to blow off any loose dust speck.
  3. Use SpeckGrabber to catch visible dust particle.
  4. Use Sensor Swab to wipe clean the sensor, carefully.
  5. Mount the lenses and release the locked-up mirror.

This cleaning process may need to repeat to get the best result due to lenses mounting, locked-up mirror release could bring in ‘new’ specks.

If this is the case, in second run, you don’t need to clean mirror and focus screen again. So you should:

  1. Have every tool ready to use.
  2. While lenses is mounted, locked-up mirror or switch on ‘cleaning function’.
  3. Detached lenses
  4. Clean with SpeckGrabber if the new dust isn’t as serious as prevous.
  5. Use Swab

This is a photo I took (F22) after first run, there is a new speck introduced while ‘old’ ones had gone.

still one to go
Link to a large size

This is a photo I took after second run. No speck or greyish dust anymore.

no dust == world peace!
Link to a large size

World peace!

07 August 2007

Ely Cathedral


Ely Cathedral
Originally uploaded by Jingye
Lady's Chapel Ely Cathedral. Dedicated to Virgin Mary. The largest of its kind in Europe. All four walls are engraved with delicate statues, unfortunately, all have been defaced in 16th century.

I like the mysterious air set in this photo.

18 May 2007

Sikh Golden Temple


This photo has recently been selected as the winner of the theme ‘Tourist attractions from your travels’
by flickr group ‘The world though my eyes’ and blogged here.

‘This photo from the "tourist attraction" travel thread made a real impression on me. The tranquility, elegance and reverence of this shot is something to behold.’

I am thrilled and very happy.

You can see more photos of Sikh Golden Temple here

04 May 2007

Jetty 6.1.2 (rc2) don't do multi core processor

Recently we upgraded our work laptop to Intel dual core processor.

After moving my local working code branch to new pc, I start to see some very strange things happened. In some tests where the web server issues an httpClient call to itself hangs indefinitely. No time out; no response, the thread is just suspended.

In comparison, the very same code runs merrily on my old pc (single core), I can see the httpClient request invokes a new thread on itself.

Adding the mystery, the problem on dual core pc is intermittent- in about 20% occasion it starts a new thread.

Jetty doesn't spawn a new thread on multi core CPU. Looking back I can come to this conclusion but the process to get to here wasn’t easy. Then I google out this bug report

I quickly upgrading to Jetty 1.6.3 - the stable build just released, the problem've gone away.

22 April 2007

Macro Photography


0.005sec (1/200); f/13; Focal Length:105 mm; ISO Speed:640;Exposure Bias:0 EV;Flash fired; using 12 and 20mm extension tube

Received Kenko extension tube set this week. Today I have a play with it.


My favourite subject is ladybird. Though very small, it is a very beautiful beetle with bright red shell doted. The size–about 5-7mm-presents a serious challenge for macro photography.

Back earlier April, I used Macro function comes with the lenses for close up shooting, which can be manually focus (with moving camera back and forth) at around 0.45m distance. The finished shoots after crop and interpolation(up size of the digital image by calculated and filling the pixels) become blur at edges. This is understandable-the finished photo I used as desktop is actually 4 times the life size by digital up scaling, counting the actual projection size of the beetle on the CCD sensor(or film emersion) it is much smaller. Later I will show you image magnification ratio chart.


0.005sec (1/200); f/9; Focal Length:105 mm; ISO Speed:100;Exposure Bias:0 EV;Flash No; Using Macro function

It must be optical magnification to solve the problem properly rather than resize the digital image. There are few solutions around, such like use reverse ring to mount a 50mm lenses reversely. Use a bellow or an extension tube. Each solution has its pros and corns.


Reverse ring is the cheapest solution. you can pick up one from eBay for around £5 including postage from China. It exposed the lenses inside out, without proection to the lenses element it could be a hazardous. And of course you lost TTL metering and auto focus.

Bellow is the most flexible but quite bulky. It takes a platform with ruler and guiding rails. I feel it is not the best choose for field shooting. I saw one on eBay going for £160 with a compliment 50mm FD lenses. A new one without lenses shipped from China costs about 30 pounds includes p&p.

That leaves candidate extension tube. By mounting it ( or combine a few and) to camera body, then mount lenses to it, you have the balance of flexibility, portable and lenses protection.
There are two types of extension tubes around. The economical one costs around £10 pounds, it doesn’t come with electronic contact points, so the camera and your AF, TTL lenses are disconnected. The one I brought made by Kenko comes with build-in contact points, it relays the communication between lenses and camera body. So it retains TTL metering and auto focusing. Costs £55 pounds from HK. About the price I paid for a 50mm 1.8F prime lenses. Consider there is no lenses, no motor and no circuit board but just 3 aluminium rings, it is quite expensive.

shown with 12, 20 and 36mm extension tubes mounted (See the red dots behind the lenses?)

Anyway I am quite excited to have a new gadget under my belt.

Global warming speeds up this Spring. Back three weeks ago there are a lot of ladybirds around our garden, now they all seemed gone away. So it is very lucky I found a fella basking sun in the grass.

First I mounted a 25mm tube and set our little friend to a tulip leave. Didn’t use flash as the sunlight was still strong. Auto-focus is usable, but not very useful as the field of depth is very shallow regardless aperture: a little motion from the subject will mean refocusing. And the auto focusing is just not fast enough to cope. The strong wind didn’t help neither. With the magnifying effect from the tube, it renders subject violent movement.

After a few attempts, I retreated. Took my little model with the stem he is resting on and set the shooting studio over dinning table.

I use flash mounted with diffuser. First I try 25mm, then 25mm plus 12mm and finally 25mm plus 12mm plus 36mm. At the beginning I didn’t bother to set up tripod, thinking with speed at 1/200 and image stabiliser, it should be alright without – I was wrong, later I checked the photos and found there are compromised on quality.

With all three tubes mounted, the Maginification ratio increased to 6.1 for a 50mm lenses. I zoomed to around 100mm so the shake from the hands were even apparent. So a tripod is a must. In fact I use release cable and set the custom function to enable mirror lockup.


0.005sec (1/320); f/9; Focal Length:105 mm; ISO Speed:400; Exposure Bias:-1EV;Flash No; Using 20mm extension tube


0.005sec (1/320); f/9; Focal Length:105 mm; ISO Speed:400; Exposure Bias:-1EV;Flash fired; Using 12, 20 and 36mm extension tube

After shooting, I resize the photo to be the same as the CCD size - for Canon 5D it is 23.84 x 35.8mm then measure the beetle’s size then compares to it is actual size: 6mm. Here is the actual magnification ratio chart:
(Setup) (CCD Projection size) (Mag. ratio)

macro: 2.8mm 0.467

12,20 36mm ex.tube: 8.5mm 1.417 (approx.)

12 and 20mm ex.tube: 7.6mm 1.267

20mm ex.tube: 3.75mm 0.625 (approx.)

P.S. Also found Cannon 5D handles high ISO noise quite well. With noise reduction switch on, it only becomes visibly grainy at 1000 or above.

My close up shooting album.

29 January 2007

Custom configuration with nested collections in .Net 2.0

I am writing this as a brain dump.

Has been played around with .NET 2.0 strong type configuration this weekend (a bit late, I know). After some uneven drive-thanks to the lack of documentation- I finally produce a custom configuration file like the one below.

(For my work colleagues at Talis, yeah you - I know you will check my blog – If you are wondering why I am not using the time on our project for RDF Java configuration. Honestly, I do. I mean you absorb and learn from a competing technology, getting ideas from patterns, even the naming convention it uses – particularly there is Reflector for sneaking around.)

Here is the custom configuration setting with nested collection:
<section name="workflowConfig" type="Jingye.Workflow.Exe.WorkflowConfigSectionHandler,Workflow" />


<workflowConfig seperateProcesses="true" processWaitTime="50000">
<setup workingPath="c:\temp\" />
<workflow name="WorkflowOne" interval="15" dailyRun="true" startTime="09">
<task name="task1" onError="Abort"/>
<task name="task2" onError="Log" />
</workflow>
<workflow name="WorkflowTwo" interval="9999" dailyRun="true" startTime="08">
<task name="anotherTask1" onError="Abort"/>
<task name="anotherTask2" onError="Log" />
</workflow>
</workflowConfig>

Some well-known bits and bobs
1. Where is my config file?
For web app, this setting is in web.config. It will be picked up by ConfigutationManager as the default config file.
For console app or win service, you need to tell the Configuration about this file.
1) The short form. You app.exe.config file should be side by side with app.exe. Framework will ‘intelligently’ figure out the path and suffix ‘.config’ to the exe.
Configuration config = ConfigurationManager.OpenExeConfiguration("Workflow.exe");
WorkflowConfigSectionHandler scheduler = (WorkflowConfigSectionHandler)config.GetSection("workflowConfig");

2) The long form. The short form wraps this long form for convenient sake, but if you want to load a config from a different location or even pass in as command line argument, these are the lines to use

ExeConfigurationFileMap fileMap = new ExeConfigurationFileMap();
// relative path names possible
fileMap.ExeConfigFilename = @"c:\temp\exe\ConfigTest.exe.config";
// Open another config file
Configuration config =
ConfigurationManager.OpenMappedExeConfiguration(fileMap,
ConfigurationUserLevel.None);

//read/write from it as usual
ConfigurationSection mySection = config.GetSection("workflowConfig");

2. Your configuration section - the root derives from System.Configuration.ConfigurationSection. Back in .Net 1.x era, this is traditionally called XXXXHandler as it implements IConfigurationSectionHandler interface.

3. Each configuration element is declared as class derives from ConfigurationElement. Configuration element can have child elements, again derives from ConfigurationElement.

4. Configration elements take attributes/properties - decorates class properties with ConfigurationProperty. However configuration element doesn’t take CDATA text as body.

[ConfigurationProperty("seperateProcesses", DefaultValue = "true", IsRequired = false, IsDefaultCollection = true)]

5. Assign a key property in ConfigurationPropertyAttribute decoration. Such like ‘name’. You will need this to locate your configuration element in a MAP.

6. If a config element is a collection such like this, you also need to implement a façade to manage access to each member, this MyConfigElementCollection class is derived from ConfigurationElementCollection class.

Less well-known bits about MyConfigElementCollection class

1. By default, MyConfigElementCollection uses AddRemoveClearMap as its merging semantics – meaning how machine.config and your web.config or app.exe.config should merge together.
You can override this to be BasicMap or AddRemoveClearMapAlternate or BasicMapAlternate. Mark Gabarra discusses each of this merging semantic in his blog “.Net Configuration Default Behaviour”, worth a read if you are wondering ‘how could I stop downstream config changes my setting?’

public override ConfigurationElementCollectionType CollectionType
{
get{ return ConfigurationElementCollectionType.BasicMap;}
}


2. Override ElementName, if you are not using AddRemoveClearMap or just find another ‘<add>’ being confusing to the guy actually uses your app.
By default, ElementName is “” (String.Empty), because in AddRemoveClearMapAlternate semantic, elements should be view as ‘operation instructions’ – add, remove or clear an element. The real name of the element is passed in the strong typing context, hence anonymous is acceptable. Nevertheless, it is less self-describing to the user.
protected override string ElementName
{ get { return "workflow"; } }

3. In the parent element, where an instance of this element or a collection of this elements is declared, give the default name – “” as the name in ConfigurationProperty.
[ConfigurationProperty("", IsRequired = false, IsDefaultCollection = true)]
public WorkflowConfigElementCollection Workflows
{
get
{ return (WorkflowConfigElementCollection)base[""]; }
set
{ base[""] = value; }
}

I find this is confusing at the beginning, but if link back to point 2, it all make sense on how reflection and serialization works.

Reference:
Mark Gabarra, blog “.Net Configuration Default Behaviour
Jason Diamond blogs on using call back custom validator: Custom Configuration Validator Weirdness
Alois Kraus: Read/Write App.Config with NET 2.0

11 January 2007

Five things

Five Things about you and five firends of yours

Admit that it is hard for me to come with five friends who blogg, this is difficult. And my Talisian colleagues are moving fast – I would say although your colleagues are your friends (at least in theory), you are not meant to tag them as this spirals into a workspace dead loop.
Now I am pulling my hair for the five coz Rob exhausts (almost) all work-bloggers I know, thanks also goes to Ian (internet alchemy) D too. No, nil, zero, no one (Andy, I leave Sarah to your account).

So if you wonder who this quietly Jingye is, here is the five of him:

  1. I got to gym at least five times a week, do a 5km/30mins run before finishing the day.
  2. I consume around 500 minutes podcast each week, mostly IT and digital photography related. My most favourite is BBC documentary archives and the least favourite is IBM Institute for Business Value.
  3. Danni, my wife and I have recently completed a 25 km charity walk for British Heart Foundation at the Peak District.
  4. My latest gadget is a Canon 5D digital camera. Here is one (more are in my flickr).
  5. I organise outdoor activities for the alike Chinese expats in Britain. Our next call is ‘Winter Farm Experience’ at Lake District.

Stafford - Baswich

And here are five friends of mine: mumu, xp, flywhc, TheTime, Sisyphus

08 December 2006

Effective Writing

Found Jeremy Stell-Smith's Effective Writing a very useful guide from a TDD developer’s point of view on getting things done – without being distracted or going deviation in the writing.

I still got a few travel essays pending – ‘todo’ since July - seem very daunting task, considering it is a part-time hobbits thing. In the running up to the New Year, I am going to try to apply these principles.

  • Work top down – do outline first
  • Question Driven Writing – compare that to test driven development to stay on topic.
  • Work in Sprints - cutting off the distraction and shut yourself down to external.

  • 11 November 2006

    AppDomain, process and components...

    This is a fundamental concept in .Net. In this short retrospective I try to offload following points:
    1. What is AppDomain? Aslo a derived question: what is the difference between Appdomain and process?
    2. Why we need AppDomain?
    3. What is the design implication of Appdomain has on software?

    So what is AppDomain? What is the difference between Appdomain and process?
    From gotnotnet
    “Application Domain is a construct in the CLR that is the unit of isolation for an application.” In non-.NET CLR environment, each running application is hosted by a process. There can be numerous processes launched of the same application and each process can only host ONE application. In contrast, .NET CLR introduces a light-way unit to load an application – AppDomain. Each AppDomain hosts one application, (or indeed assembly, component). Each process can have multiple AppDomains.

    Why we need AppDomain?
    AppDomain provides isolation around applications without the heavy cost associated with running an application within a process (address space, context, security...). In another word when addressing security context for example, it is wrapped around process unit. It relives each resident in an AppDomain from handling it themselves.

    The isolation means:
    • An application can be independently stopped.
    • An application cannot directly access code or resources in another application.
    • A fault in an application cannot affect other applications.
    • Configuration information is scoped by application. This means that an application controls the location from which code is loaded and the version of the code that is loaded.

    What is the design implication of AppDomain has on software?
    AppDomain promotes a loose-coupled component-oriented programming mode.

    The term component is probably one of the most overloaded terms in morden software engineering. From Wikipedia I found quite a few entries, which defines ‘component’ in different domain. Where it is related to computer science, it reads ‘A piece that makes up a whole, a part of an assembly’. Very abstract. In electronic component, it says ‘An electronic component is a basic electronic element usually packaged in a discrete form with two or more connecting leads or metallic pads. Components are intended to be connected together…’ This definition is more vivid to use as a metaphor here.

    In .net a class *IS* a component. In the extreme form, one can compile a .net class into a binary assembly. Then CLR can load it into an AppDomain of a process.
    From runtime process’ point of view, ‘traditional’ programming model/application is packaged to a monolithic binary block, regardless how it maps class diagram for business logic. Monolithic binary means they are tightly coupled. A change to one class can trigger a massive relinking of the entire application and necessitate retesting and redeployment of all other classes.

    In contrast, a .net component based application is a collection of binary building blocks grouped by functionality. Each block contains one or more classes. At run time, each block is loaded to an AppDomain, together, they make up a process. If one of the component needs to be update, changes are contained to that component only. No existing client of the component requires recompilation or redeployment. An updated component can even be updated while a client application is running, as long as the component isn’t currently being used.

    02 November 2006

    Create your custom xAnt task

    Here are some notes on how to extend ant task to provide your custom ant task.

    Both ant build (for Java) and nAnt build (for .net) are discussed.

    1. nAnt

    In nAnt for .net build you embedded c# code as script though semantically it is a derived class from Nant.Core.Task. (You don’t need to include Nant.Core assembly. It is loaded by default). A scripting block is a top level block, meaning side by side with <target> block.

    In following sample script., the first static c# function is a - function - to work out number of running processes by given name.
    The secnd task class is to kick off an external batch file - if you want the batch running in a separate process there isn't better way that this cumbersome one.
    The third task class is to kill a process.

    <script language="C#" prefix="custom">
    <code>
    <![CDATA[
    [Function("NumberOfRunningProcess")]
    public static int NumberOfRunningProcess(string name)
    {
    System.Diagnostics.Process[] procList = System.Diagnostics.Process.GetProcessesByName(name);
    return procList.Length;
    }

    [TaskName("WriteRunXspBatchScript")]
    public class WriteRunXspBatchScript: Task
    {
    private string _batchFilePath;
    private string _httpRootPath;
    private int _port;

    [TaskAttribute("XspRunScript", Required=true)]
    public string BatchFilePath
    {
    get{return _batchFilePath;}
    set{_batchFilePath=value;}
    }

    [TaskAttribute("HttpRootPath", Required=true)]
    public string HttpRootPath
    {
    get{return _httpRootPath;}
    set{_httpRootPath=value;}
    }

    [TaskAttribute("Port", Required=true)]
    public int HttpPort
    {
    get{return _port;}
    set{_port=value;}
    }

    protected override void ExecuteTask()
    {
    string cmd = string.Format("start /MIN xsp --root \"{0}\" --port {1}", _httpRootPath, _port);
    using (StreamWriter wr = new StreamWriter(_batchFilePath,false))
    {
    wr.WriteLine("@echo off");
    wr.WriteLine(cmd);
    }
    }
    }
    [TaskName("StopXsp")]
    public class StopXsp : Task{
    private bool _deleteXsp;
    private string _xspRunScript;

    [TaskAttribute("DeleteXspRunScript", Required=false)]
    public bool DeleteXspRunScript
    {
    get{return _deleteXsp;}
    set{_deleteXsp=value;}
    }

    [TaskAttribute("XspRunScript", Required=false)]
    public string XspRunScript
    {
    get{return _xspRunScript;}
    set{_xspRunScript=value;}
    }

    protected override void ExecuteTask() {
    System.Diagnostics.Process[] procList = System.Diagnostics.Process.GetProcessesByName("mono");
    if (procList==null )
    {
    throw new Exception("No Mono process found. Expect to kill one and only one mono xsp process");
    }
    if (procList.Length>1)
    {
    throw new Exception("More than one Mono processes is running. Expect to kill one and only one mono xsp process");
    }
    try
    {
    procList[0].Kill();
    }
    catch(Exception){;}

    if (_deleteXsp)
    {
    File.Delete(_xspRunScript);
    }
    }
    }
    ]]>
    </code>
    </script>


    Usage:
    <echo message="process devenv ${custom::NumberOfRunningProcess('devenv')}" />
    <WriteRunXspBatchScript Port="80" HttpRootPath="${webcontrolsUnitTest.src.dir}" XspRunScript="${build.dir}\${MonoXspRun}" />
    <StopXsp DeleteXspRunScript="true" XspRunScript="${build.dir}\${MonoXspRun}"/>

    2. ant
    Reference to Extending Ant to support interactive builds, to archive this you need to write external java classes, expose package via classpath by system envronment variable or via <path> in the build script.

    The only change to the sample code given in
    Extending Ant to support interactive builds is instead of using classpath, it uses <path> :
    <?xml version="1.0"?>
    <project name="PropertyPromptExample" default="main" basedir=".">
    <property name="promptTimeout" value="5"/>
    <path id="extendedTask">
    <fileset dir="c:\playpit\">
    <include name="monkeyNuts.jar"/>
    </fileset>
    </path>
    <taskdef name="propertyprompt" classname="com.ibm.samples.apache.tools.ant.taskdefs.optional.PropertyPrompt" classpathref="extendedTask"/>

    <target name="main">
    <!-- <javac srcdir="." destdir="." verbose="on"/> -->
    <property name="propA" value="oldValA"/>
    <property name="propA" value="oldValA1"/>
    <echo>value of propA: ${propA}</echo>
    <echo>value of propB: ${propB}</echo>
    <propertyprompt propertyname="propA" promptcharacter=":">Enter value for propA</propertyprompt>
    <propertyprompt propertyname="propB" defaultvalue="defvalB">What is the value for propB</propertyprompt>
    <echo>value of propA: ${propA}</echo>
    <echo>value of propB: ${propB}</echo>
    </target>
    </project>

    27 October 2006

    Export & Import Goodie from/to Photoshop


    Just finished my retrospective notes on Photoshop Action and Batch to watermark images then I think 'wait a minute, I have all these - custom shape custom action in one pc, how do I port it to another? I don't want to repeat the manual creation work again.

    It is a very simple task, a quick search found that IM Photography's tips: Installing and exporting Photoshop actions Likewise you can export and import custom shape by first select the shape, then click on the little play trangle at the top right corner to bring up the context menu, then select 'save shapes...'

    Photoshop Action and Batch to watermark images

    Jingye says: 'I am scratching my head on Photoshop tasks'. I am not a pro (digital) photographer. With busy life, I just want to get some reasonable quality picture from my digital cameras. I took many many photos during holidays (easliy over 5Gb for two weeks in a exotic country). I only have time to tidy them up a little bit, mostly an auto-leveling and an auto-curving. Then I will print some, upload a small size to flickr; archive a large version.

    Many ps tasks I have done in the pass were forgotten fast. So here I steal/rewrite from other people’s Photoshop tips/how to do something. I claim not rights of them unless stated. This is just my web notepad for myself and everyone else.’

    Photoshop Action and Batch to watermark images

    Rewrite and proved based on Chris Kitchener's Watermarking your photos in Photoshop 7 and CS technique ) and Watermarking Photos (batch)

    Objective:
    1) Create a reusable watermark.
    2) Create a custom action and use Photoshop’s batch command to process a group of images to apply watermark.

    Applicable versions
    :
    Photoshop CS (v8) and Photoshop v7

    Prep work
    :
    I used transparent watermark for protecting IP rights yet showing off pictures. I would try to make all images looked consistent when viewed as a collection-the size, effect, position etc. For this reason, I will resize all images to a certain size (see Using Photoshop Actions and batch command to resize images . Then group landscape and portrait photos in two source folder (i.e. source_landscape, source_portrait) 2) create two actions: e.g. ‘watermark Landscape’ ‘watermark portrait’.
    Create an ‘output’ folder as well.

    Task 1: Create an custom shape, which will be used as watermark later.
    At this stage there is no need to tweak the shape yet for special effect yet, just create a new document with plain text/logo. For example a square logo can be of Width: 3 inches x Height: 3 inches, Resolution: 300 pixels per inch (ppi) and the Colour Mode: Greyscale, Contents: White, Type the text with desired font and size it to fill all canvas.
    (important) Go to the 'Layer' menu, highlight 'Type' and select 'Create Work Path'. This action converts the text to an outline vector path. To add the shape the library, choose 'Define Custom Shape' from the "Edit' menu and name the item 'watermark'. Click 'OK'.

    Task 2: Create Watermark
    1) Open a test image, ideally this should be in similar size to those will be in batch process later, pick an image that it is not too dark around watermark application area. Also consider an watermark for lanscape and portrait images each. Here I will only give lanscape images as example.
    2) In the 'Preferences', check that the 'Units and Rulers' are set to 'Inches'. 'Units' set to 'Pixels' or 'Percent' create a watermark that changes size based on the files resolution and will prove unreliable.
    3) Add a new layer(shift+ctrl+n), nae it 'watermark'.
    3) From Toolbox, select 'Custom Shape Tool' (U), found under the 'Rectangle Tool'. Select 'watermark' shape from the listed icons.
    4) Hold 'shift' key and draw watermark on new layer to fill the entire width.
    5) (Layer menu) Rasterize->shape
    6) (Filter menu) Stylize->Emboss, angle 135
    7) (Layer menu), 'Layer Style' ->'Blending Options'. Set the layer blending mode to "Hard Light" to let the image show through
    8) Sets up the file and its attributes. (File menu)->File Info (Alt+Ctrl+i). Key in the information you want attached to the file.
    copyright info: Some rights reserve. Attribution-NoDerivs 2.0 UK: England & Wales You are free: to copy, distribute, display, and perform the work to make commercial use of the work(http://creativecommons.org/licenses/by-nd/2.0/uk/)
    9) Flatten the file.
    Watermark is done.

    Task 3: Record Task 2 as a custom action

    Close all working files. Now we ready to create an watermark action. Most of the steps in this task is repeat from task 2.

    1) Open an new image to be worked on.
    2) Create a new action. Click the “create new action” icon in the Actions panel.
    3) Name this Action “watermark lanscape image”. As soon as you create a new Action, your
    action starts recording.
    4) Repeat task 2 all steps
    5) stop recording
    5) Save image use 'save as' from File menu. Remember(very important): DO NOT rename the file; and save it to the target output folder that batch process is output to. (the reason for this two points are explained here: Using Photoshop Actions and batch command to resize images)
    5) Stop recording.
    6) Close working image,
    7) Open the original image. Test& re-recording “watermark lanscape image” action to satifaction.

    Task 4: Batch process all images
    1) In Photoshop, go to FILE --> AUTOMATE --> BATCH.
    In the Play section pull down "Action" and select "watermark lanscape image" action you created earlier.
    3) The “Source” Section. Since we did not create an “Open” Command in our Action, we need to make sure the “Override Action “Open” Commands” is NOT checked. The “Suppress file Open Options Dialog” should be checked. And the “Suppress Color Profile Warnings” should be checked.
    4) Click the “Choose” button and select the folder "source_landscape" you created in prep-work.
    5) The “Destination” Section. The “Destination” should be set to “Folder”. Click on the “Choose” button and select the folder you created called “output”. Make sure the “Override Action “Save As” command” is checked. Otherwise batch will create two identical files for each image – one named after original name (this is what action records in ‘save for web’) and the other name after the following pattern.
    6) In the “File Naming” Section. I prefer to prefix original image file name with something like ‘forWeb_’ just to differential it from original file. To do this Set the first box to ‘forWeb_’ second box to “Document Name” and the third box to “Extension”.
    7) uncheck 'Override Action "Save as" commands'
    8) Now, to process your images, just click “Ok”.
    And that’s it. (repeat this for protrait images)

    Photoshop Action and Batch to resize images

    Jingye says: 'I am scratching my head on Photoshop tasks'. I am not a pro (digital) photographer. With busy life, I just want to get some reasonable quality picture from my digital cameras. I took many many photos during holidays (easliy over 5Gb for two weeks in a exotic country). I only have time to tidy them up a little bit, mostly an auto-leveling and an auto-curving. Then I will print some, upload a small size to flickr; archive a large version.

    Many ps tasks I have done in the pass were forgotten fast. So here I steal/rewrite from other people’s Photoshop tips/how to do something. I claim not rights of them unless stated. This is just my web notepad for myself and everyone else.’


    Using Photoshop Actions and batch command to resize images.

    Rewrite and proved based on tsion (http://www.sitepoint.com/forums/showthread.php?t=252128 Apr 10, 2005, 10:38’s tutorial)

    Objective: Create a custom action and use Photoshop’s batch command to process a group of images to a certain size.
    Applicable versions: Photoshop CS (v8) and Photoshop v7
    Prep work: Resize will based on a certain axis, i.e. width/height. To maintain a consistent size of a collection of photos, it is better to 1) group landscape and portrait photos in two source folder (i.e. source_landscape, source_portrait) 2) create two actions: e.g. ‘resize to width 800’ ‘resize to height 800’.
    Create an ‘output’ folder as well.

    In the following walk though we will do ‘resize to width 800’ only, same principle apples to ‘resize to height 800’.

    1) Copy all landscape images you want to resize to the “source_landscape” folder.
    When you copy your images, I recommend you copy them all to the root directory in the “original” folder, don’t use any subfolders. This you’ll ensure that you have no duplicate images, or images with the same filename.

    Now we record custom automation action.

    2) In Photoshop, open an arbitrary image.
    3) Now, create a new action set. To do this, we click on the folder icon in the Actions panel. Let’s name this set “Custom”. I like to keep my custom actions in their own set, so I can find them easier later on.
    4) Next create a new action. Click the “create new action” icon in the Actions panel.
    5) Name this Action “resize to width 800” As soon as you create a new Action, your action starts recording.
    6) To resize the image: Go to IMAGE --> RESIZE IMAGE. This will open the “Image Size” dialog box. Now let’s change the width of our image to 800 pixels wide. Then click “OK”.
    7) Now immediately after you click “OK”. Go to FILE --> SAVE FOR WEB. Set your jpg parameters how you normally would and click save.
    Due to a bug in cs, there are two things described here must be follow:
    7.1 Make sure you save this file in the “output” folder that we created in prep work.
    7.2 DO NOT rename the file, just save it as it is. Otherwise you will get ‘Replace Files’ message window in batch process later for each image. (more below)

    8) Click the “Stop recording” icon in the Actions panel. Our new Action is complete, and ready to use.
    Now we are ready to process our images.

    9) Go to “output” folder and delete the image you saved there when you created your action. This is just so it doesn’t get mixed in with the images you’re processing.

    10) In Photoshop, go to FILE --> AUTOMATE --> BATCH.

    11) The “Play” section. Change your set to “Custom”. And your Action to ““resize to width 800” this sets the Action you created earlier.

    12) The “Source” Section. Since we did not create an “Open” Command in our Action, we need to make sure the “Override Action “Open” Commands” is NOT checked. The “Include Subfolders” option doesn’t matter. The “Suppress file Open Options Dialog” should be checked. And the “Suppress Color Profile Warnings” should be checked.

    13) Click the “Choose” button and select the folder "source_landscape" you created in prep-work.

    14) The “Destination” Section. The “Destination” should be set to “Folder”. Click on the “Choose” button and select the folder you created called “output”. Make sure the “Override Action “Save As” command” is checked. Otherwise batch will create two identical files for each image – one named after original name (this is what action records in ‘save for web’) and the other name after the following pattern.

    15) In the “File Naming” Section. I prefer to prefix original image file name with something like ‘forWeb_’ just to differential it from original file. To do this Set the first box to ‘forWeb_’ second box to “Document Name” and the third box to “Extension”.

    Now, to process your images, just click “Ok”.
    And that’s it.

    Question 1: When I run the batch command, PCS brings up the replace image dialogue asking me is I want to replace the previously saved image, which obviously I don't.
    What am I missing?

    Answer: First, the output folder in ‘resize to width 800’ action must be identical to what it is set in batch process output folder.
    Second, Do not rename the file in recording the action, this seemed like confused the batch process.

    Question 2: 'm trying to batch process ..alot of images...but everytime i run the batch, the picture quality appears after each image, asking me to save at what size. This is alot to go thorugh when i have thousands of pics, is there a way around this? So far from what i've seen, the answer is no.

    Answer: use ‘Save for web’, not ‘save as’

    23 October 2006

    Strong Typing vs. Strong Testing

    [Blog on Blog]

    ... without a full set of unit tests (at the very least), you can't guarantee the correctness of a program. To claim that the strong, static type checking constraints in C++, Java, or C# will prevent you from writing broken programs is clearly an illusion (you know this from personal experience). In fact, what we need is

    Strong testing, not strong typing.

    points to note:

    1. A very concise code sample comparing strong type and weak type language, where weak type loose the semantic on checking variable type – it works as long as it implements the method expected.
    2. unit test is an extension to complier

    03 October 2006

    mono XslTransform vs .net XslTransform observation

    Although by and large mono is the reincarnation of .net for the poor, there are subtle differences between them. Here is what I found on Xsl Transformation. Mono XML interprets xsl:last() function in a significant different way to native .net. XML.


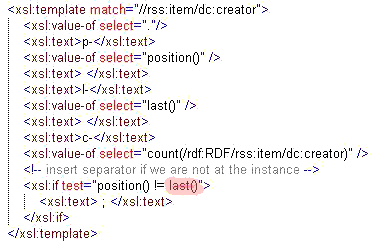
    Using the same xml style sheet with a few debug trace: p – xsl:position(); l – xsl:last; c-xsl:count()
    Mono rendering:

    Native .Net rendering:

    And the source code:
    We also found the insignificant whitespaces in the two versions are placed differently.

    We are able to spot these difference in a consistent, repeatable and fully automated way by writing Ruby+Watier scripts before writing any code. The test script fully emulates an IE browser object. It instantiates an browser window and issues http request. We can then either assert the html source character by character or more semantically and interactively, do things like @ie(:id, "myLink").click

    15 September 2006

    update/delete/insert nodes to an xml document


    Load an xml document to memory. Nevigate the DOM object, using xpath to query nodes. To update the node: create an new one, and replace the existing one.
    Default namespace in xml doc still needs to declare in namespace mamager- and use in the xpath query. Although it is not present in the xml data:
    Sample Data

    C# Code to do this:
    private void SetTestData(int index, int itemsPerPage, int totalResults)
    {
    XmlTextReader reader = new XmlTextReader("..\\TestData_V1.xml");
    XmlDocument doc = new XmlDocument();
    doc.Load(reader);
    reader.Close();

    string osUri = "http://a9.com/-/spec/opensearch/1.1/";

    XmlNamespaceManager nsMgr = new XmlNamespaceManager(doc.NameTable);
    nsMgr.AddNamespace("os", osUri);
    nsMgr.AddNamespace("rdf", "http://www.w3.org/1999/02/22-rdf-syntax-ns#");
    nsMgr.AddNamespace("dc", "http://purl.org/dc/elements/1.1/");
    nsMgr.AddNamespace("rss", "http://purl.org/rss/1.0/");

    XmlNode oStartIndex, oItermsPerPage, oTotalResults;
    XmlElement root = doc.DocumentElement;

    oStartIndex = root.SelectSingleNode("/rdf:RDF/rss:channel/os:totalResults", nsMgr);
    oItermsPerPage = root.SelectSingleNode("/rdf:RDF/rss:channel/os:itemsPerPage", nsMgr);
    oTotalResults = root.SelectSingleNode("/rdf:RDF/rss:channel/os:startIndex", nsMgr);

    XmlElement nStartIndex = doc.CreateElement("os", "startIndex", osUri);
    XmlElement nItermsPerPage = doc.CreateElement("os", "itemsPerPage", osUri);
    XmlElement nTotalResults = doc.CreateElement("os", "totalResults", osUri);

    nStartIndex.InnerXml = index.ToString();
    nItermsPerPage.InnerXml = itemsPerPage.ToString();
    nTotalResults.InnerXml = totalResults.ToString();

    root.SelectSingleNode("/rdf:RDF/rss:channel", nsMgr).ReplaceChild(nStartIndex, oStartIndex);
    root.SelectSingleNode("/rdf:RDF/rss:channel", nsMgr).ReplaceChild(nItermsPerPage, oItermsPerPage);
    root.SelectSingleNode("/rdf:RDF/rss:channel", nsMgr).ReplaceChild(nTotalResults, oTotalResults);

    doc.Save("..\\tempTestData.xml");
    }

    02 September 2006

    The ASP.NET Page Object Model

    Revisit and take away from Dino Esposito's classic article The ASP.NET Page Object Model

    Code Behind

    The code of a page is the set of event handlers and helper methods that actually create the behavior of the page. This code can be defined inline using the tag or placed in an external class—the code-behind class.

    1. Think it this way make it easier to break away sequnential mentally on reading/writing code.
    2. Code behind is totally optional.
      1. You can have 'orphan' aspx page derived from web.UI.Page directly. In situations, say that you are testing good and feel of a web control
      2. You can have all aspx derived from a common code-behind class

    AutoEventWireup

    VSNET IDE wizard generates boiler-plate aspx contains @page like this

    <%@ Page language="c#" Codebehind="MyPage.aspx.cs" AutoEventWireup="false" Inherits="MyNameSpace.MyPage" %>

    For backward compatibility with the earlier VB programming style, ASP.NET also supports a form of implicit event hooking. By default, the page tries to match special method names with events; if a match is found, the method is considered a handler for the event. ASP.NET provides special recognition of six method names. They are Page_Init Page_Load, Page_DataBind, Page_PreRender, and Page_Unload. These methods are treated as handlers for the corresponding events exposed by the Page class. The HTTP run time will automatically bind these methods to page events saving developers from having to write the necessary glue code. For example, the method named Page_Load is wired to the page's Load event as if the following code was written.

    this.Load += new EventHandler(this.Page_Load);

    The automatic recognition of special names is a behavior under the control of the AutoEventWireup attribute of the @Page directive. If the attribute is set to false, any applications that wish to handle an event need to connect explicitly to the page event. Pages that don't use automatic event wire-up will get a slight performance boost by not having to do the extra work of matching names and events. Although VSNET creates aspx with the AutoEventWireup attribute disabled, the default setting for the attribute is true, meaning that methods such as Page_Load are recognized and bound to the associated event.

    You should always explicitly register an appropriate handler instead of relying on AutoEventWireup.

    Another interesting experitment. set AutoEventWireup="true" and also keep the following line in the InitializeComponent of code-behind. Put a Response.Write to it. It is called twice!

    this.Load += new System.EventHandler(this.Page_Load);

    The Page Lifecycle

    Stage Page Event Overridable method
    • Page initialization
    Init


    • View state loading

    LoadViewState Restores view-state information from a previous page request that was saved by the SaveViewState method

    • Postback data processing
    (implicitly by Page base class -ProcessPostData (private))
    Call to LoadPostData methods in the controls tree that implements the System.Web.UI.IPostBackDataHandler

    interface (e.g. TextBox)
    • Page loading
    Load

    • Postback change notification

    RaisePostDataChangedEvent method in any control that implements the IPostBackDataHandler interface

    • Postback event handling
    Any postback event defined by controls RaisePostBackEvent method in any control that implements the IPostBackEventHandler interface

    • Page pre-rendering phase
    PreRender


    • View state saving

    SaveViewState

    • Page rendering

    Render

    • Page unloading
    Unload

    The ProcessPostData is a private method implemeted at Page class which contains code like this:

    IPostBackDataHandler handler1 = (IPostBackDataHandler) control1;
    if (handler1.LoadPostData(text1, this._requestValueCollection))
    {
    this._changedPostDataConsumers.Add(handler1);
    }
    if (this._controlsRequiringPostBack != null)
    {
    this._controlsRequiringPostBack.Remove(text1);
    }

    A simple page to demo this cycle: PageLifeCycle.zip (contains PageLifeCycle.cs and .aspx, unzip and add them to a web proj. to see it in action)

    31 August 2006

    TDD web controls dev life cycle

    An entire upside down experience to help coder focus on deliver 'good enough' requirements

    In summary this dev pattern is

    1. decide deliverables - the rendered html as browser user sees. (step 1, 2)
    2. write ruby script to test the html (in fact it is reversed test the test script) (step 3)
    3. act as web designer to use the web control to build a test page (of course, the web control is not existed yet) (step 4)
    4. Implment web control (step 5)
    5. test the web control (step 6-7)
    6. change loop

    A well designed website should be broken into three domains:
    1) Reusable Web controls which render plain html
    2) bare bone website composed of web controls. Pages are served as control containers and responsible for managing navigation, user experience. It should contains no inline css but class/id/name that allows UI designer change the 'skin' without touching the website, not even a downtime.
    3) CSS

    Here is the Test Driven Development Cycle
    1. Agree with UI designer on html template. the static html prototype is the 'contract'.

    2. break down the template into componentised controls that will be generated with user/custom controls. Save the html corresponding to the control to a new html e.g. ~\gallery\searchbox.html
    <html>
    <body>
    <!--search box-->
    <div id="PARENTDIV" name="PARENTDIV" class="TestGlobalStyleClass">
    <label id="PARENTDIV.MessageLabel" name="PARENTDIV.MessageLabel">TestMessageLabelText</label><br>
    <input type="text" id="PARENTDIV.SearchTerm" name="PARENTDIV.SearchTerm" class="SearchTermClass" size="100" maxlength="100">
    <a href="http://test.webcontrols.com" id="PARENTDIV.AdvLink" name="PARENTDIV.AdvLink"
    title="Test ToolTip" class="AdvLinkClass">Test Link Text</a>
    <!--search box close--></div>
    </body>
    </html>

    3. Write an Ruby script 'SearchBoxTestFixture.rb' to test this template. This is to validate our test case is sounds.

    require 'watir'
    require 'test/unit'
    require 'test/unit/assertions'
    include Watir

    class SearchBoxTestFixture <>
    def setup
    localHostXSP = "http://127.0.0.1"
    localHostIIS = "http://localhost/Talis.Web.Cenote.WebControls.Test"
    @staticTemplate = 'http://localhost/Talis.Web.Cenote.WebControls.Test/static/searchbox.html'
    remoteHost = "http://talis.com";
    @testSite = localHostIIS
    @ie = IE.new
    end

    def teardown
    @ie.close
    end

    def test_allHtmlElementsExist
    # page = "SearchBoxTest.aspx"
    # @ie.goto(@testSite+'/'+page)

    # test static html template
    @ie.goto(@staticTemplate)

    assert_equal(1, @ie.divs.length, 'Expecting only one div')
    assert(@ie.div(:id, /PARENTDIV/).exists?, "Expecting div id 'PARENTDIV'")
    assert(@ie.div(:name, /PARENTDIV/).exists?, "Expecting div name 'PARENTDIV'")

    #assert message label
    assert_equal(1, @ie.labels.length, 'Expecting only one lable box')
    assert(@ie.label(:id, /PARENTDIV.MessageLabel/).exists?, "Expecting label id 'PARENTDIV.MessageLabel'")
    assert(@ie.label(:name, /PARENTDIV.MessageLabel/).exists?, "Expecting label name 'PARENTDIV.MessageLabel'" )
    assert('TestMessageLabelText', @ie.label(:id, "PARENTDIV.MessageLabel").innerText)

    #assert input box
    assert_equal(1, @ie.text_fields.length, 'Expecting only one input box')
    assert(@ie.div(:id, /PARENTDIV/).text_field(:id, 'PARENTDIV.SearchTerm').enabled?, "Expecting textbox id 'PARENTDIV.SearchTerm'" )
    assert(@ie.text_field(:name, 'PARENTDIV.SearchTerm').exists?, "Expecting textbox name'PARENTDIV.SearchTerm' textbox element")
    assert_equal(100, @ie.text_field(:id, 'PARENTDIV.SearchTerm').size(), "Expecting textbox size 100")
    assert_equal(100, @ie.text_field(:id, 'PARENTDIV.SearchTerm').maxLength(), "Expecting textbox maxLength 100")

    #assert link
    assert_equal(1, @ie.links.length, 'Expecting only one link')
    assert(@ie.link(:id, 'PARENTDIV.AdvLink').exists?, "Expecting link id 'PARENTDIV.AdvLink'" )
    assert(@ie.link(:name, /PARENTDIV.AdvLink/).exists?, "Expecting link name 'PARENTDIV.AdvLink'" )
    assert_equal('http://test.webcontrols.com/', @ie.link(:name, /PARENTDIV.AdvLink/).href, "Expecting link url 'http://test.webcontrols.com'" )
    assert(@ie.link(:title, 'Test ToolTip').exists?, "Expecting link title (tool tip) 'Test ToolTip'" )
    assert_equal('Test Link Text', @ie.link(:id, 'PARENTDIV.AdvLink').innerText, "Expecting link text 'Test Link Text'" )

    end
    end

    4. write SearchBoxTest.aspx that intend to render as to searchbox.html. Ours contains this:
    <My:SearchBox
    ID="PARENTDIV"
    Class="TestGlobalStyleClass"
    MessageLabel_Text="TestMessageLabelText"
    MessageLabel_Class="TestMessageLabelClass"
    SearchTerm_Class="SearchTermClass"
    SearchTerm_Size="100"
    AdvLink_Class="AdvLinkClass"
    AdvLink_Tooltip="Test ToolTip"
    AdvLink_InnerText="Test Link Text"
    Runat="server"
    />

    5. Implement the custom web control: SearchBox.cs

    6. If haven't done so, write nUnit Testfixture to hook* ruby script into your test dll. So all tests will feedback as red/green light

    7. Modify SearchBoxTestFixture.rb to target SearchBoxTest.rb.

    Contract changed, start from 1. again

    Notes:
    1. You need to install Ruby WATIR
    2. Travis Illig has this fatastic RubyTestExecutor integrates ruby and watir test scripts into nUnit test framework. Check his paper Integrated ASP.NET Web Application Testing with NUnit, Ruby, and Watir on code project.